
Start here
Create your account and find your way around
Sign up or sign in at app.lastroundai.com, verify your email, and learn what each part of the dashboard does before you install anything.
Watch the 4-minute walkthrough: the toolbar, a live question with real-time transcription, a coding round, an online assessment, Ask, your recap and history. Chapters are in the video description on YouTube.
Step 1: Open app.lastroundai.com
The web app and the desktop app share one account. The sign-in and sign-up forms both live on the front page of app.lastroundai.com. If you are already signed in you land on the Dashboard.Step 2: Choose how to sign in
The fastest route is Sign in with Google (or Sign up with Google), shown above the email form. Google accounts are verified automatically. You can also use email and password.- New here? Click Create one under the sign-in form (the heading changes to Create your account). Enter your full name, email address and a password of at least 6 characters, then click Create account.
- Returning? Enter your email and password and click Sign in. Use Forgot password? to get a reset link by email.
Step 3: Verify your email (email sign-ups only)
After Create account you see Verify your email. Open the email titled Confirm Your Signup, copy the 6-digit code, paste it into Verification code and click Verify email. Use Resend code if it has not arrived after a minute.Can't find the code?
Check your spam or promotions folder. The code is in the email body, not in the subject line. Google sign-ups skip this step entirely.
Your dashboard
After signing in you land on the Dashboard. The left sidebar is the map of the whole product; every guide on this site tells you which sidebar item to click.
Step 4: Read the dashboard
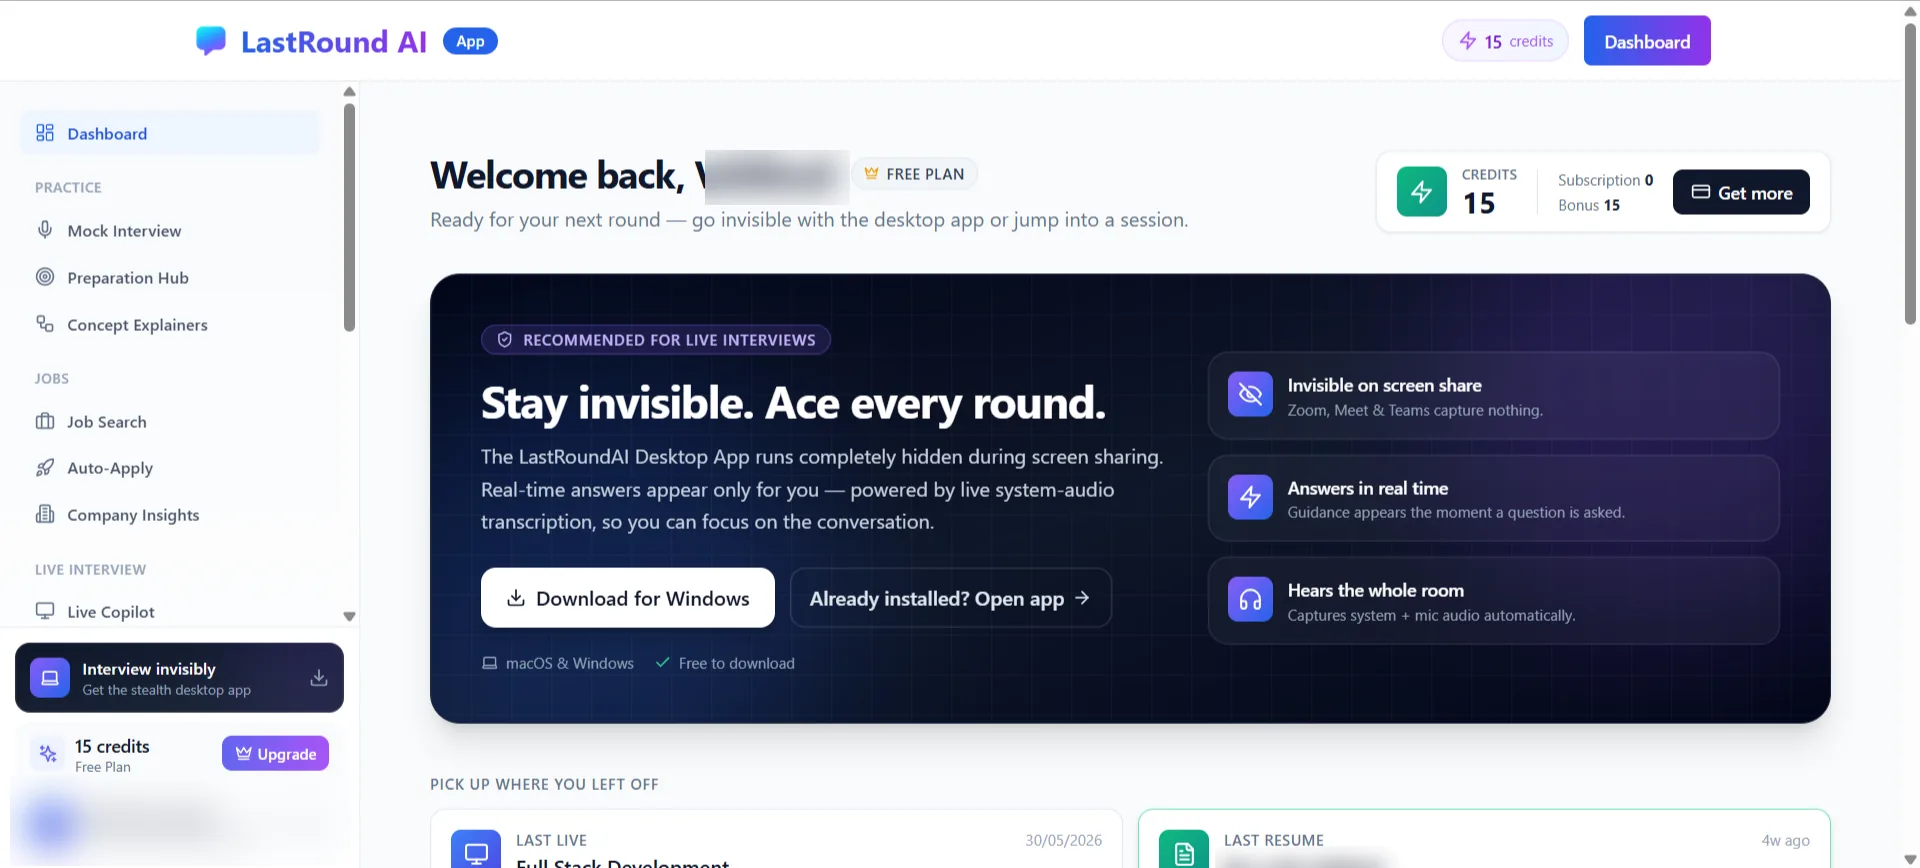
The Dashboard: credits at top right, the desktop app banner, and your recent activity below. - Credits (top right) shows your balance split into Subscription and Bonus credits, with a Get more button.
- The dark banner offers Download for Windows or Download for macOS (it detects your OS) and Already installed? Open app.
- Pick up where you left off lists your last live session and last resume.
- The bottom of the sidebar shows your plan, a credits counter and an Upgrade button.
| Sidebar group | Items |
|---|---|
| Dashboard | Your home page with credits, recent activity and shortcuts. |
| Live Interview | Desktop App, Mobile Copilot, Interview History, Top Asked Questions |
| Practice | Mock Interview, Preparation Hub, Concept Explainers, Learning Programs |
| Jobs | Job Search, Auto-Apply, Company Insights |
| Resume | Build Resume, Resume History |
| Account | Referral Program, Subscription, Settings, Support, Download Desktop App |
Step 5: Add a resume
Most features (the desktop app, Mock Interview, Job Search, Auto-Apply) give better results when they can read your resume. Upload a PDF, DOCX or TXT when a flow asks for it, or build one under Resume → Build Resume.Step 6: Check your free credits
New accounts start on the Free plan with free credits already loaded. Interview features are billed per minute of connected time, so a short practice run costs very little. See the credits guide for how each feature is charged.Step 7: Decide where you will interview
Video interview on Zoom, Google Meet or Microsoft Teams? Install the desktop app next. Live interviews run in the desktop app only, and it stays invisible on screen share. Phone or in-person interview? Use the Mobile Copilot from your phone's browser.
Privacy settings live in Settings → Data & privacy
The Interview review history toggle controls whether your interview questions and answers are saved to your account. Turn it off and future transcripts are not stored; session duration and credits used are still recorded for billing. Account deletion is on the same tab.
Your first run, from install to your first answer
The whole path in one place, in the order it happens. Each step links to the guide that covers it properly, so read this once for the shape of it and follow the links for the detail. Allow about ten minutes, and do it the day before an interview rather than ten minutes before one.
Step 8: Install the desktop app
Open Download Desktop App in the web app and take the build it recommends: a.dmgon macOS, an.exeon Windows. On macOS, drag LastRound AI into Applications and open it from there rather than from the disk image, or macOS will not remember the permissions you are about to grant. The desktop app setup guide covers the Gatekeeper and SmartScreen notices you meet on the way.Step 9: Clear the LastRound AI Setup permission screen
The first thing the app checks is Screen Recording. If it is off, a small window titled LastRound AI Setup opens with the line Grant permissions to continue, and nothing else opens until Screen Recording is on. The window also lists Microphone, but live interviews do not need it: the app hears the interviewer through your computer's sound. Each row has a blue Grant button that turns into Permission granted once it is done.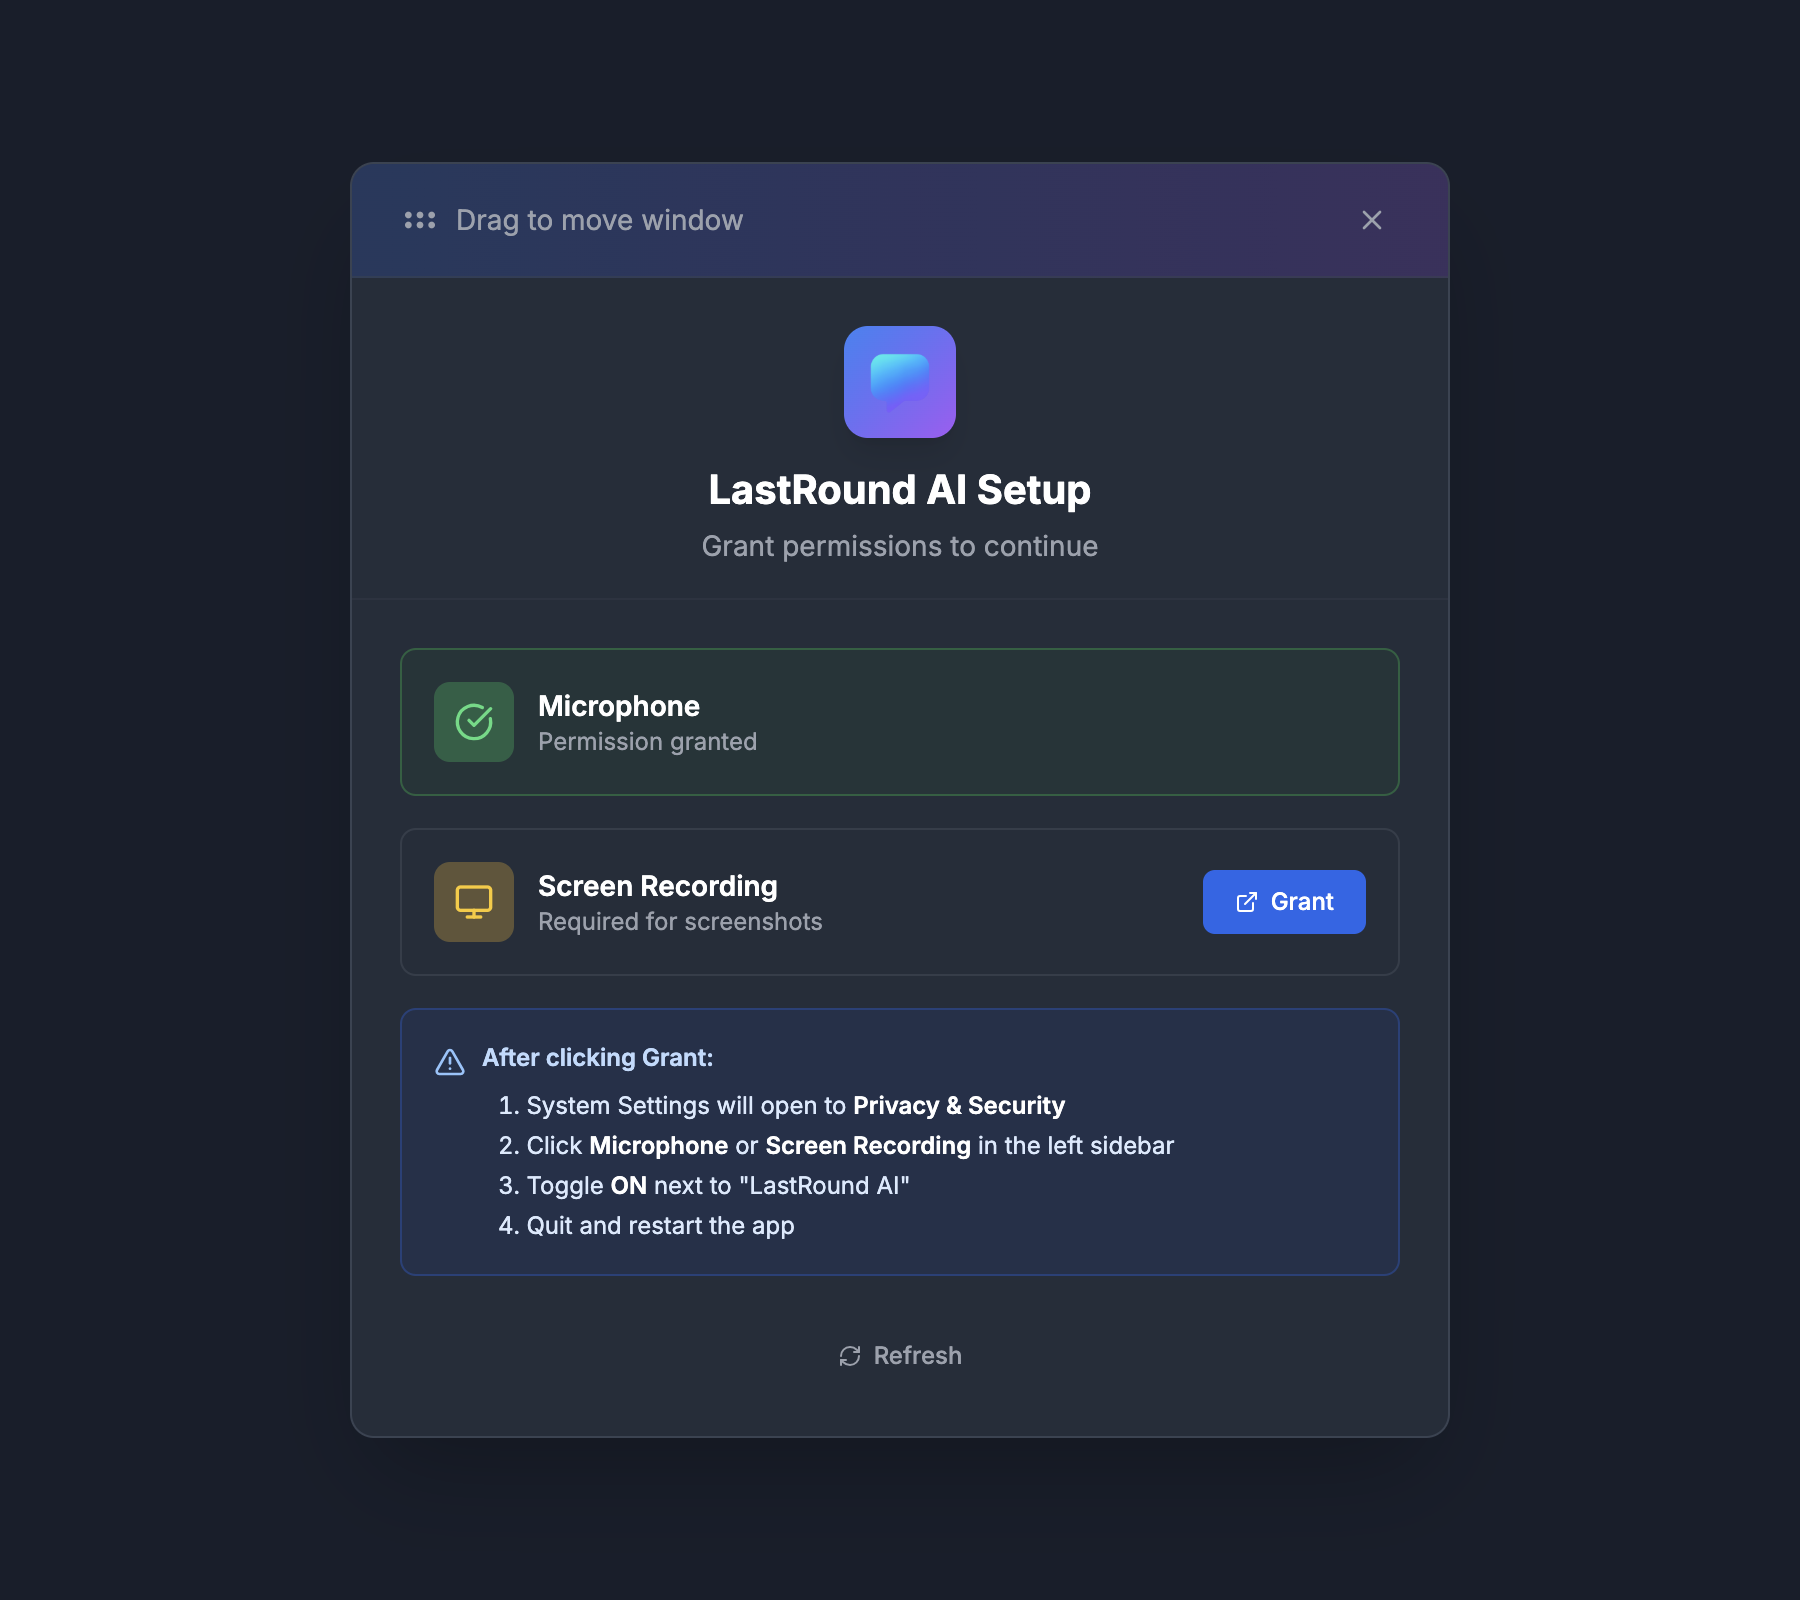
LastRound AI Setup: Screen Recording still needs one click on Grant. It is the one that matters. - Click Grant. macOS opens System Settings and the panel below the buttons tells you what to do there: it opens at Privacy & Security, you click Screen Recording in the sidebar, switch the toggle ON, then quit and restart the app.
- Refresh, at the bottom, re-checks without a restart and reads Checking permissions... while it works. Screen Recording is the one macOS only re-reads on a fresh launch, so if it stays stubborn, quit with ⌘ + Q and open the app again.
- On Windows this screen is usually skipped, because Windows grants screen capture to desktop apps by default. If it does appear, the panel reads Windows Settings will open to Privacy, then Return to the app.
Switch on the row the app names, not the row you expect
The instructions say Toggle ON next to a name in quotation marks, and that name is read from the running program rather than hard-coded. For a normal installed copy it is LastRound AI. For a development build it is Electron, because the bundle macOS and Windows actually see is the Electron runtime. Switch on whichever name the screen prints: granting the other row looks right and changes nothing.Step 10: Sign in inside the setup wizard
With permissions done, the same window becomes a five-step wizard, still titled LastRound AI Setup, with a progress counter at the bottom reading 1/5 · Welcome and so on. Step 1 lists what the app does, and Continue stays greyed out until you tick I agree to the Terms of Service and Privacy Policy. There is a Prefer to watch? 3-minute walkthrough link if you would rather see it first.- Step 2 is Sign in to your account. Use Continue with Google, which opens a Google window inside the app, or type your email and password and click Sign in. The wizard advances by itself once you are in, and shows You're signed in.
- No account yet? New here? Create an account switches the form to Create your account. Fill in your name, email and a password of at least 6 characters, click Create account, then type the 6-digit code from the Check your email screen.
- It is the same account as the web app, so the credits and resume you already have come with you. If the Google window hangs, close it and use email and password instead.
Step 11: Finish the wizard: permission, keys, role and the optional checks
Step 3, One quick permission, asks for one thing only: Screen & System Audio Recording on macOS, Screen recording on Windows. It lets the app hear the interviewer through your computer's sound and capture questions on screen. Your microphone is not used. Click Allow, or the System Settings link, and a Granted badge appears once it is on. macOS needs a fresh process for this, so the wizard offers One-time relaunch: with a Relaunch now button and resumes on this same step afterwards. Re-check status re-reads it without a restart.- Step 4, Four keys run everything, teaches ⌘/Ctrl + B to hide or show the overlay, Space to get an answer, ⌘/Ctrl + H to screenshot a problem and ⌘/Ctrl + Arrows to move it. Space on its own works only while the LastRound AI window is in front; ⌘/Ctrl + Enter gets an answer from any app.
- The same step asks When should answers appear? Pick When I ask (marked Recommended, and the one to choose) or Automatically. It is the Auto-Response setting under ⋮ → Interview Setup → How the AI answers, so you can change your mind later.
- Step 5, You're ready for your real interview, asks for Your role and Interview language, then offers three optional checks: See how live suggestions work, Try a screen question and Check what others see, which puts a QR code on screen so your phone can confirm the overlay is absent from a shared view. Click Finish setup when you are done. Later, Settings → General → Quick Actions has Test Drive and Replay onboarding to go through them again.
Step 12: Meet the overlay
The wizard closes and the app becomes a single floating toolbar that sits on top of everything else and is excluded from screen sharing and screen recording. Left to right: Ask, Capture, Answer, the credit pill, Start, the ⋮ menu and the move handle. There is one interview mode: the same session answers spoken questions and screen captures. Nothing here has started a session or spent a credit yet.
The overlay before a session. Answer is greyed out because there is nothing to answer yet. Step 13: Open ⋮ → Interview Setup and upload your resume
Click the ⋮ button at the right end of the toolbar and choose Interview Setup. Under Your resume, click Choose file and pick a PDF, DOC, DOCX or TXT up to 10 MB. The text is parsed on your computer, a toast says Resume Uploaded, and the box reads Parsed and ready with the number of words read. Until this is done the header pill reads Not ready and names what is missing.A scanned PDF has no text in it
If your resume is a photo or a scan saved as a PDF there is nothing to extract, and answers will be generic. Export a text-based PDF or a DOCX and upload that instead.Step 14: Pick the category and domain, then Save
Still in Interview Setup, under This interview, choose Interview category first; Specific domain is greyed out until you do. Paste the posting into Job description while you are here, it is optional but it is the single biggest improvement to the answers. Click Save. The header pill turns green and reads Ready to start an interview, which is your signal that nothing is missing.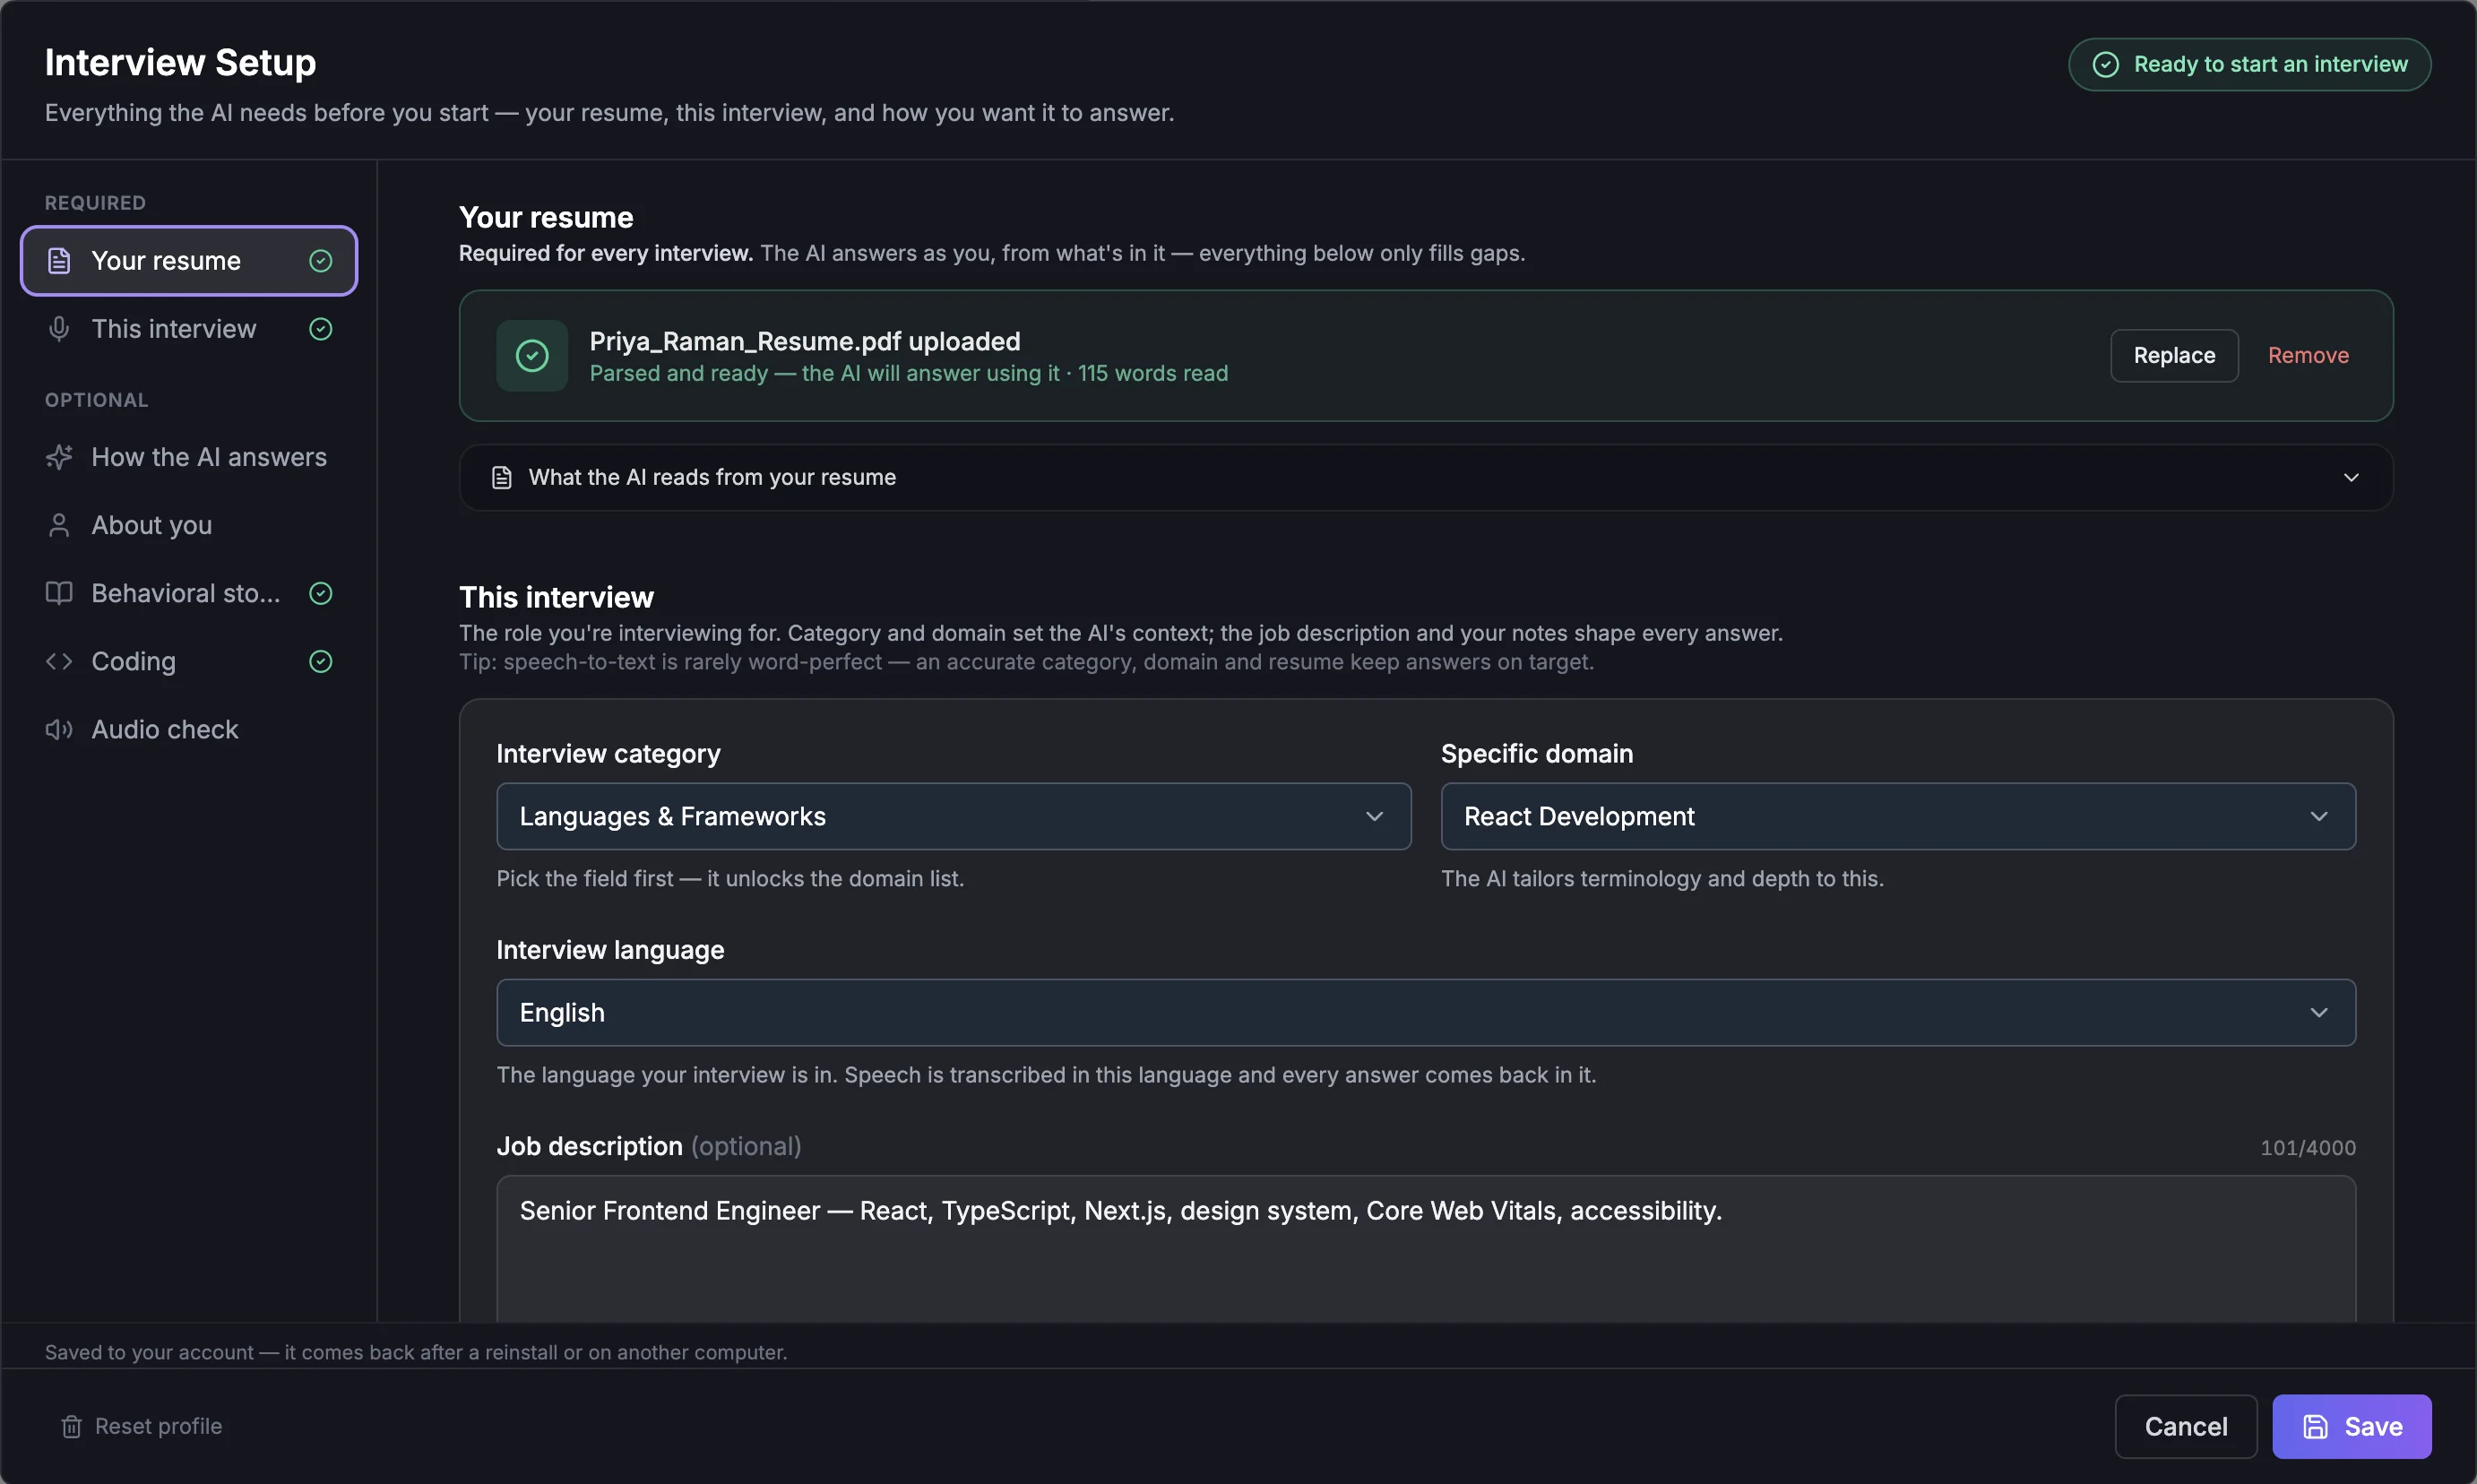
Ready to start an interview: resume on file, category and domain chosen. - Optional, and worth ten minutes before a real interview: About you (notice period, salary, visa and similar answers), Prepared answers for questions you expect, and Memory of previous interviews so later rounds stay consistent. See About you, Prepared answers and Memory.
Step 15: Run your first session
Join the meeting on your normal speakers or headphones, then click Start. The Confirm interview details screen shows the resume, domain, job description and instructions the AI will use. Click Details are correct — start interview. Billing begins here, Start becomes a red End, and a timer appears. After each question press ⌘/Ctrl + Enter, check the ANSWERING box shows the question you were actually asked, and read the answer underneath. Press End when the interview is over, because hiding the overlay does not stop the clock.- New to the app? A short guided tour opens once after you sign in. Replay it any time from Settings → General → Quick Actions → App tour, and press ⌘/Ctrl + / (or ⋮ → Keyboard shortcuts) for the full shortcut list.
- When you press End, a short recap of the interview appears (switch it off with Recap after each interview in Interview Setup). See Interview recap.
Do a dry run first
Settings → General → Quick Actions → Test Drive puts a real voice interviewer inside the app so you can learn the controls with nothing at stake. It is billed like any other session, so budget about ten credits for it. The Quick Actions guide explains it.
Still stuck?
Signed in? Open a ticket under Account → Support in the app. Otherwise use the contact form or email. Tell us what you tried, which page of this guide you were on, and your operating system or browser.