
Interview Setup: everything before the interview
Interview Setup is where you tell the AI who you are and which interview you are about to join: your resume, the role, how answers should sound, the facts only you know, and the answers you have prepared. This page explains every option with an example, then the check you see before the interview starts.
Last reviewed 2026-09-27
Watch the video
More videosWatch Interview Setup in 2 minutes, or read on: every option is explained below with examples.
Where to find it
Step 1: Open the ⋮ menu on the overlay toolbar
Click ⋮ at the right end of the toolbar, then Interview Setup.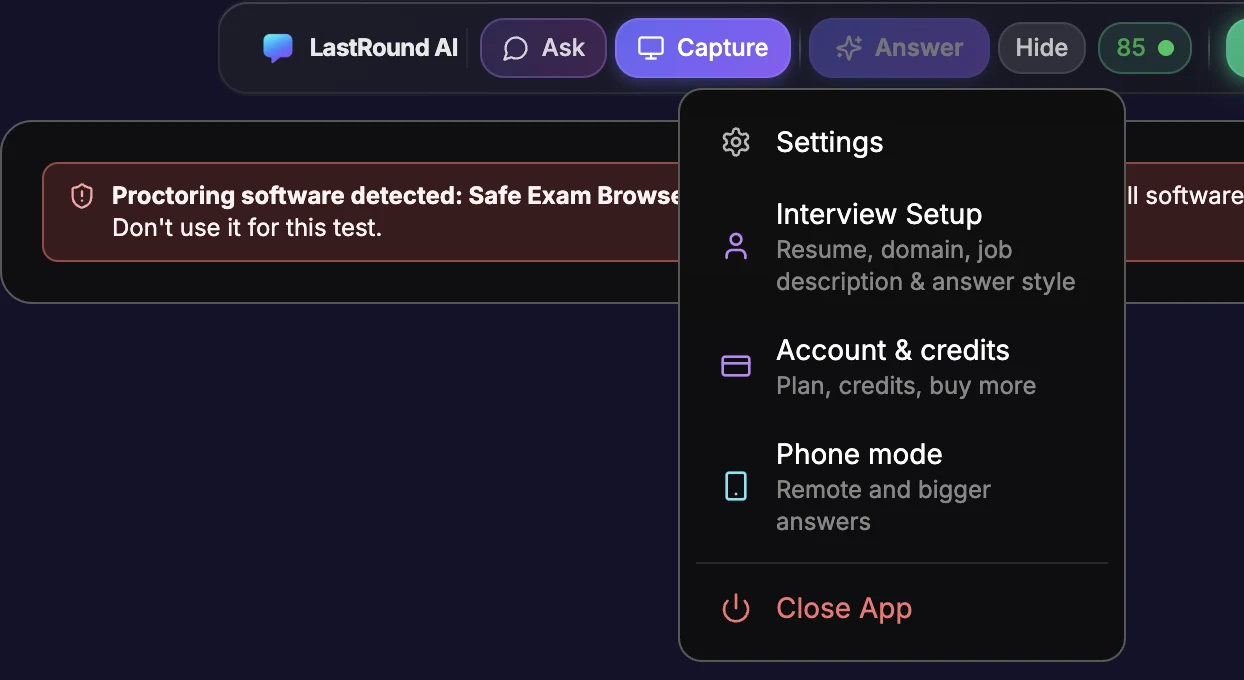
⋮ → Interview Setup. Step 2: Work down the sections
The menu on the left has two groups. Required: Your resume and This interview. Optional: How the AI answers, About you, Behavioral stories, Coding and Audio check. Click a name to jump to it. A green tick means the section is filled in; an amber dot means it still needs something.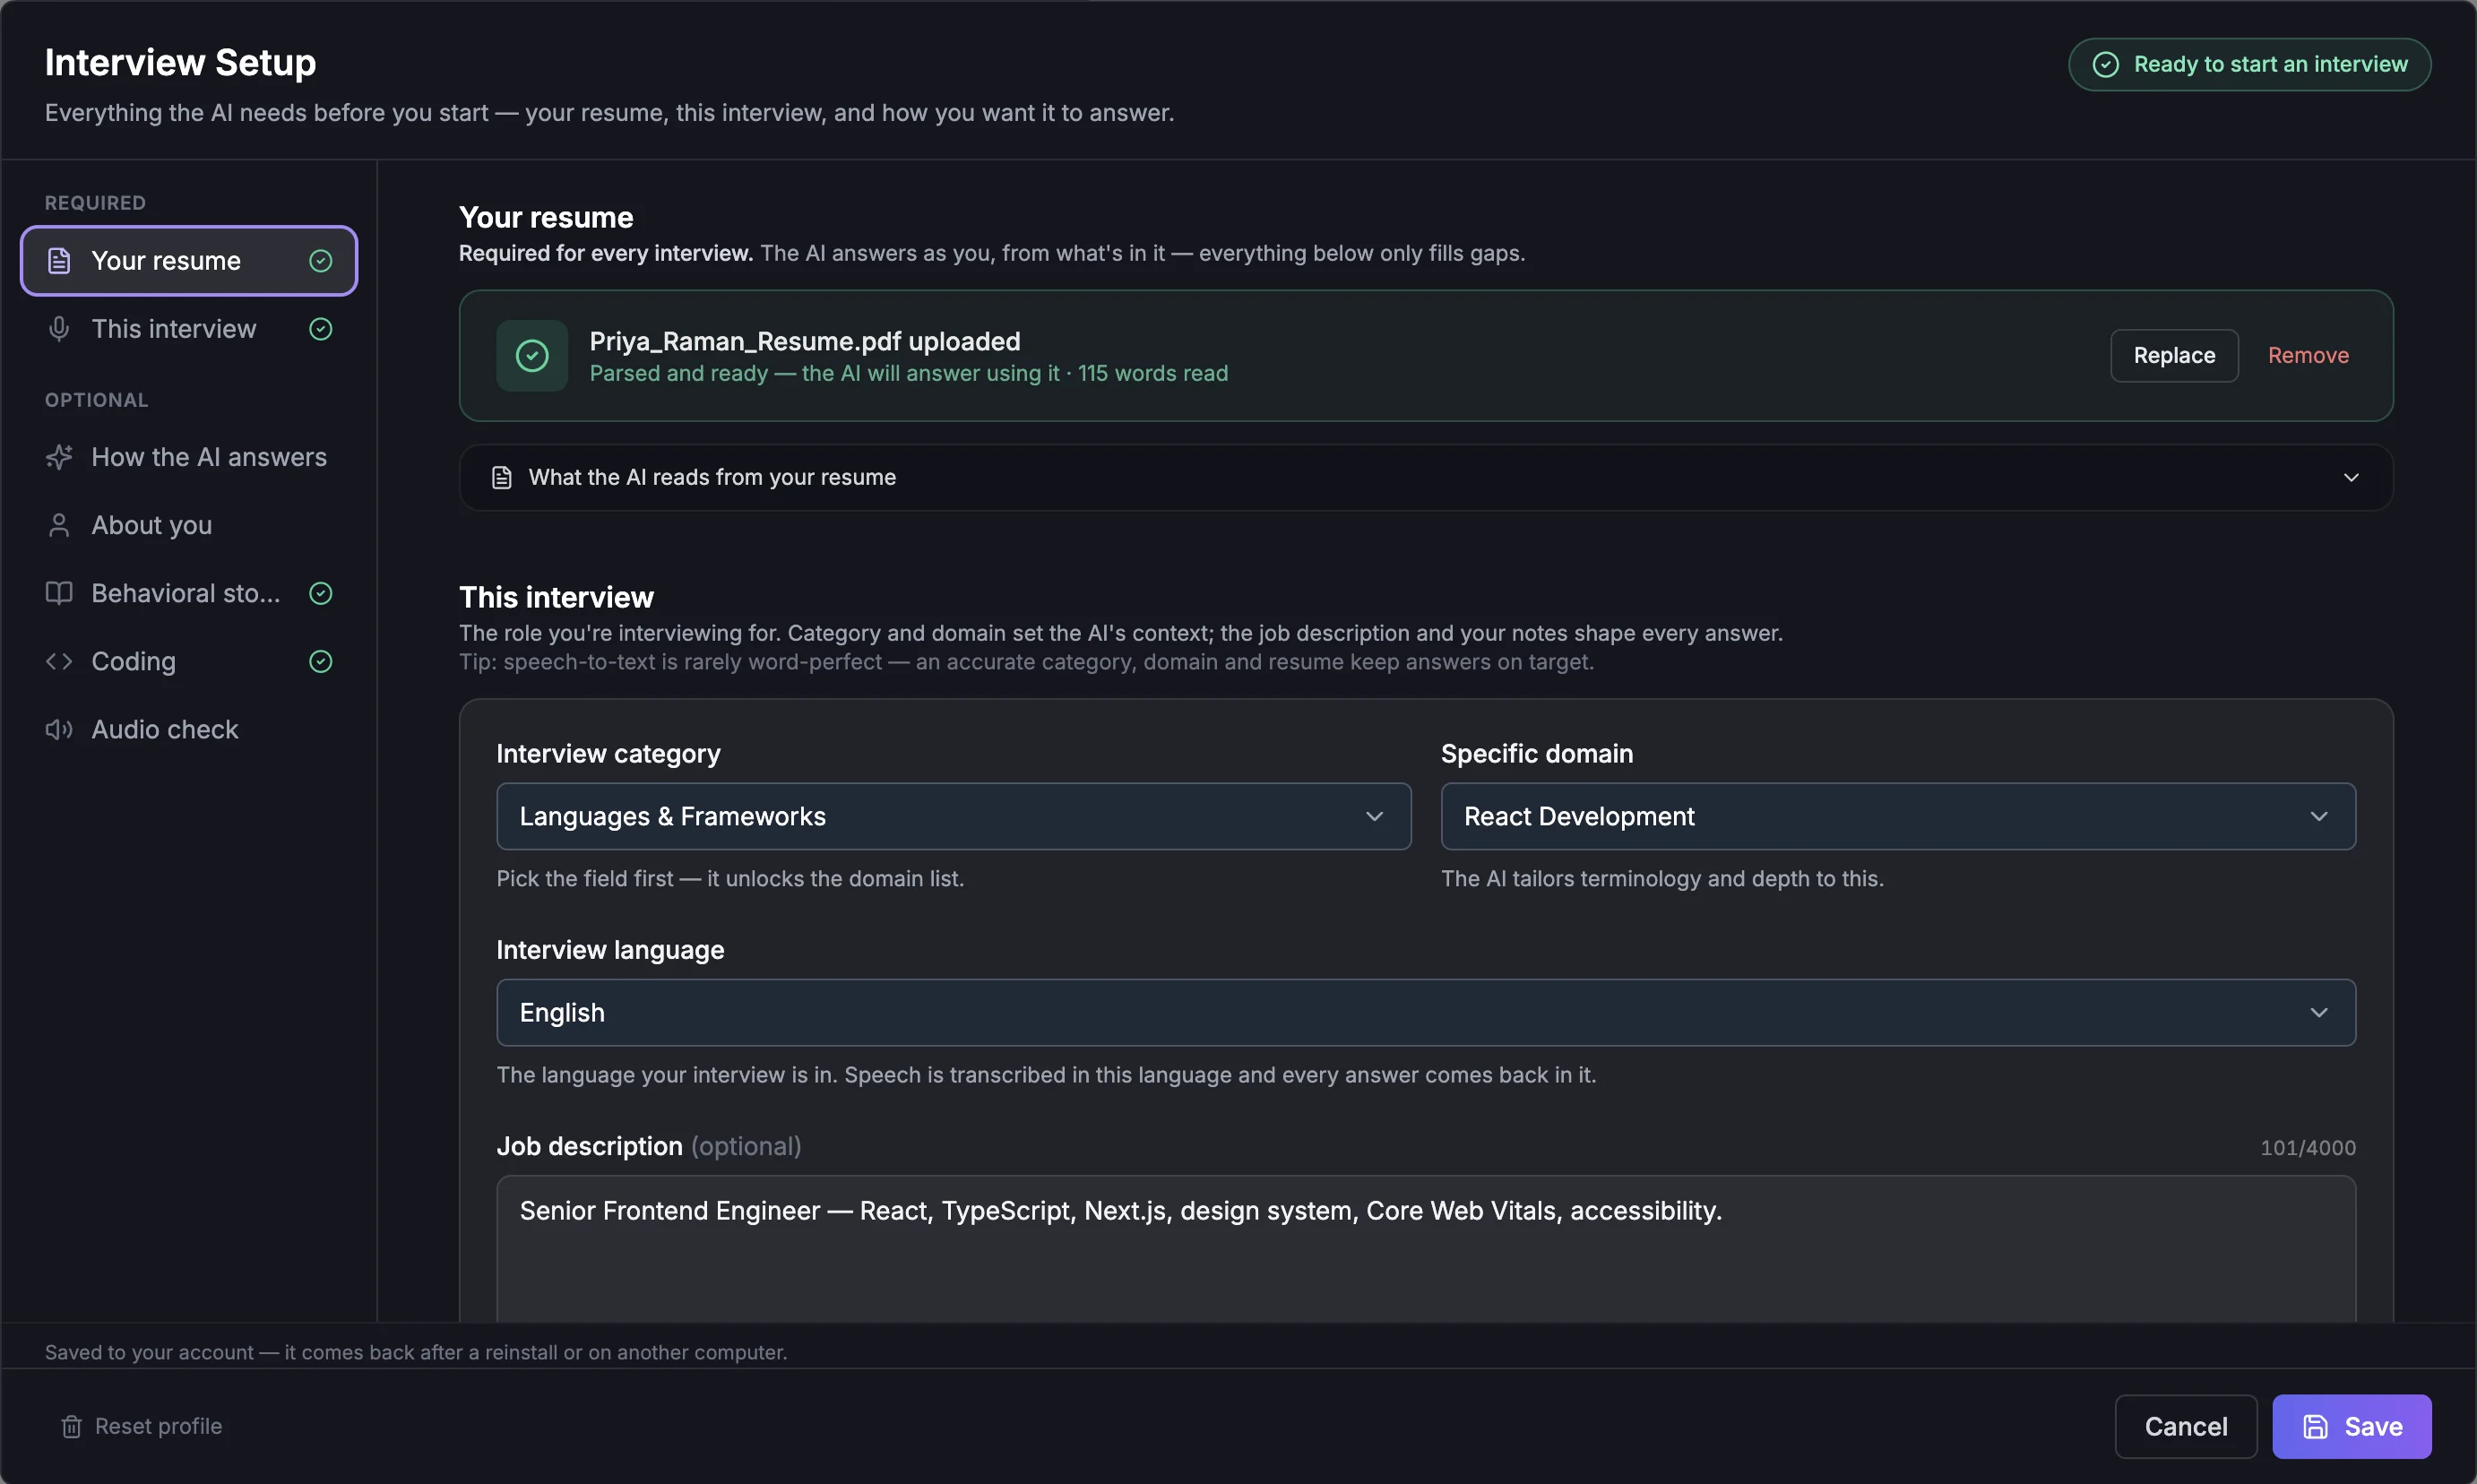
Interview Setup with a resume uploaded. The pill at the top right says "Ready to start an interview".
The pill tells you whether you can start
The example candidate
| Field | Value |
|---|---|
| Name | Arjun Mehta (made up) |
| Resume says | Backend Engineer at Northwind Payments, 4 years. Python, Django, PostgreSQL, Redis, AWS (EC2, S3). "Cut checkout API p95 latency from 800 ms to 250 ms." |
| Interviewing for | Platform Engineer. The job description asks for Kubernetes, Terraform and GitHub Actions. |
| Not on the resume | Kubernetes, Terraform and GitHub Actions. |
The example answers were written for this guide. They show the kind of answer each setting produces, not saved output. Real answers depend on your resume, the question and how the interviewer phrases it.
1. Your resume
Step 1: Upload it
Click Choose file in the Upload your resume box. PDF, DOC, DOCX and TXT work, up to 10 MB. The text is read on your computer. The box then shows the file name, uploaded, and Parsed and ready with the number of words read.- Use the resume you sent for this role. The AI treats it as the truth about your history.
- A text-based PDF or a DOCX works best. A scanned image has no text to read: if only a few words come through, you see a warning asking for a DOCX or text version.
- Only the first 6,000 characters are used, so keep your latest role and key skills near the top.
Step 2: Check what the AI reads
Open What the AI reads from your resume under the file name. It shows the exact text the AI gets. Check that names, dates and employers came through correctly.Step 3: Replace or remove it
Replace picks a different file. The new resume replaces the old one everywhere, from the next answer. Remove deletes it, and the pill goes back to Not ready. If you start an interview with no resume, the app asks you to upload one first.
What happens: The AI uses the employers, projects, tools and results in your resume. It will not claim a company, job title or date that is not in it.
Example answer with Arjun's resume loaded
Interviewer asks: Tell me about a performance problem you fixed.
"At Northwind Payments our checkout API had drifted up to about 800 milliseconds at p95. I profiled the slowest requests and found two PostgreSQL queries doing most of the work, so I added the missing index and cached merchant settings in Redis. That brought p95 down to around 250 milliseconds."
Screen captures use less of your background
2. This interview
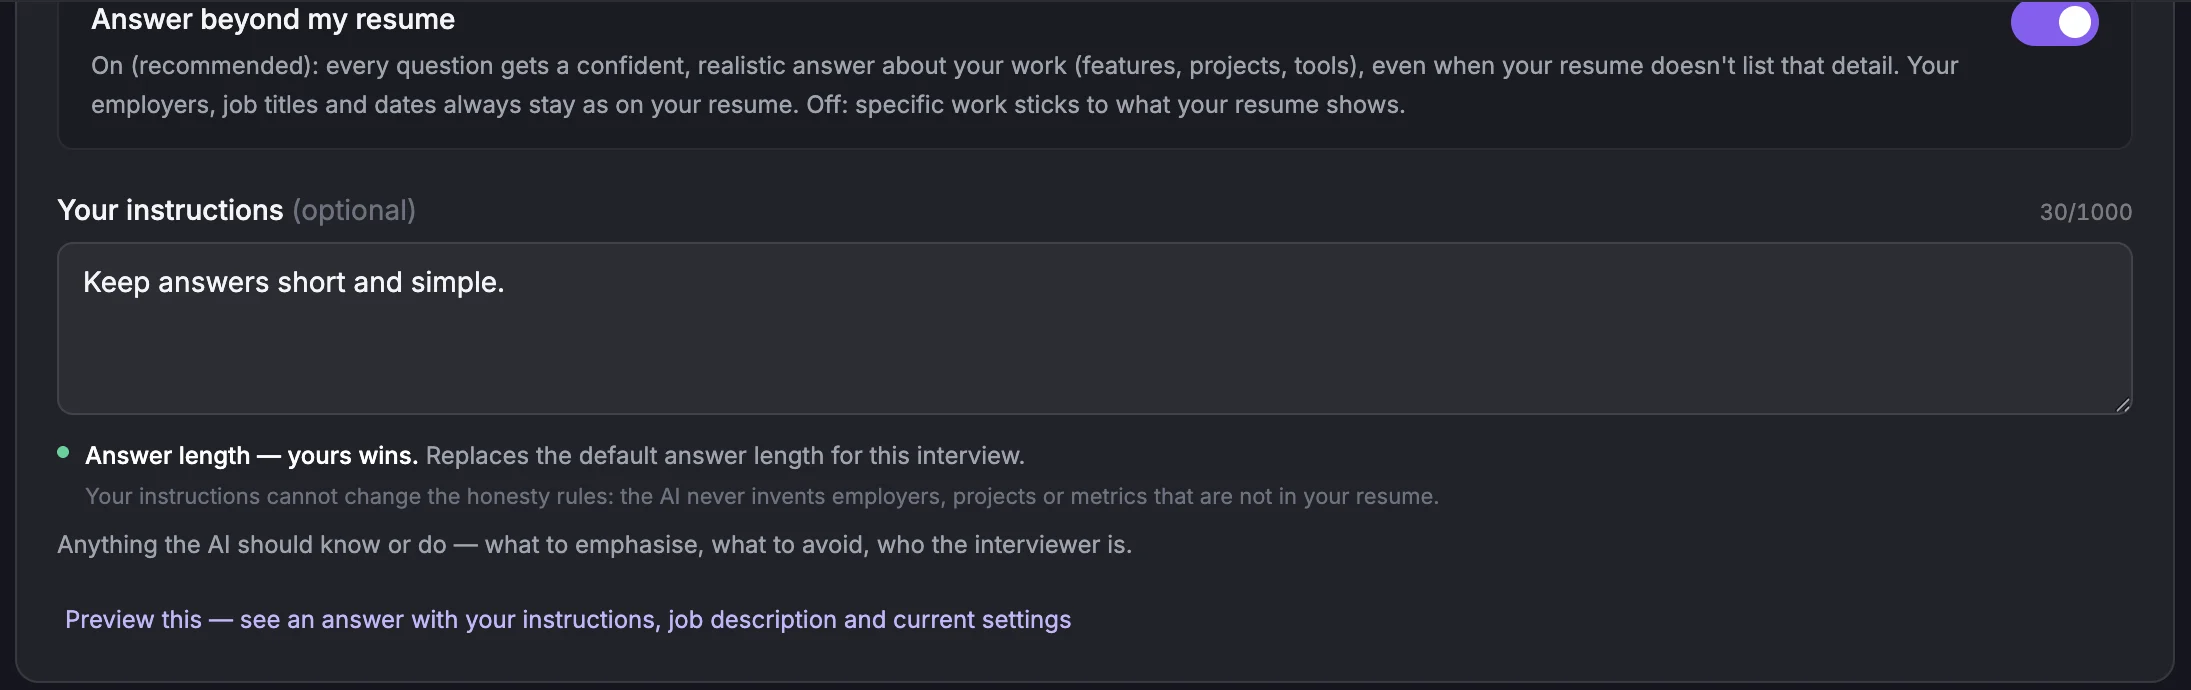
Interview category and Specific domain
Pick Interview category first; it unlocks the Specific domain list. Both are required. There are 25 categories and more than 500 domains, both searchable, covering technical roles and also healthcare, finance, accounting, HR, legal, education, government and visa interviews, and entry-level rounds such as internships. Pick the closest match even if the name is not exactly your job title.
What happens: The AI is told which field the interview is in and uses that field's terms and depth. The same question gets a different angle depending on the domain.
Interviewer asks: How would you handle a sudden spike in traffic?
Example: domain set to Backend Development
"First I would make sure the hot paths are cheap: cache read-heavy responses, keep database queries indexed, and push slow work like emails and reports onto a background queue so request threads stay free. Then I would add rate limiting so one client cannot take everyone down."
Example: domain set to Kubernetes Engineering
"I would rely on a Horizontal Pod Autoscaler driven by CPU or request rate, with sensible requests and limits so scheduling is predictable, and a cluster autoscaler so new nodes arrive when pods cannot be placed. Readiness probes keep traffic off pods that are still warming up."
Interview language
The language your interview is in. English is the default, and you can pick from 61 languages with a search box. The interviewer's speech is transcribed in that language, and every answer comes back in it.
What happens: One language per interview. Languages are never mixed and never guessed: in an English interview where the interviewer says a few words in Hindi, you still get English answers. Technical terms, product names and code keep their usual form. It applies to spoken, typed and screen answers alike.
Example: Interview language English
Interviewer asks: Can you explain what a load balancer does?
"A load balancer spreads incoming requests across several servers, so no single one is overloaded and traffic keeps flowing if one goes down."
Example: Interview language Spanish
Interviewer asks: ¿Puedes explicar qué hace un balanceador de carga?
"Un balanceador de carga reparte las peticiones entre varios servidores, así ninguno se satura y el servicio sigue funcionando si uno falla."
Pick the language the interviewer actually speaks
All 61 interview languages
Available in the desktop app. The browser and mobile copilots are not covered by this list.
- English
- Afrikaans
- Arabicالعربية
- ArmenianՀայերեն
- Assameseঅসমীয়া
- BelarusianБеларуская
- Bengaliবাংলা
- BosnianBosanski
- BulgarianБългарски
- CatalanCatalà
- Chinese (Cantonese)粵語
- Chinese (Mandarin)中文
- CroatianHrvatski
- CzechČeština
- DanishDansk
- DutchNederlands
- EstonianEesti
- FinnishSuomi
- FlemishVlaams
- FrenchFrançais
- Georgianქართული
- GermanDeutsch
- GreekΕλληνικά
- Gujaratiગુજરાતી
- Hebrewעברית
- Hindiहिन्दी
- HungarianMagyar
- IndonesianBahasa Indonesia
- ItalianItaliano
- Japanese日本語
- Kannadaಕನ್ನಡ
- KazakhҚазақ
- Korean한국어
- LatvianLatviešu
- LithuanianLietuvių
- MacedonianМакедонски
- MalayBahasa Melayu
- Marathiमराठी
- MongolianМонгол
- Nepaliनेपाली
- NorwegianNorsk
- Pashtoپښتو
- Persianفارسی
- PolishPolski
- PortuguesePortuguês
- Punjabiਪੰਜਾਬੀ
- RomanianRomână
- RussianРусский
- SerbianСрпски
- SlovakSlovenčina
- SlovenianSlovenščina
- SpanishEspañol
- SwedishSvenska
- Tagalog
- Tamilதமிழ்
- Teluguతెలుగు
- Thaiไทย
- TurkishTürkçe
- UkrainianУкраїнська
- Urduاردو
- VietnameseTiếng Việt
Job description (optional)
Paste the posting, up to 4,000 characters. The requirements and responsibilities matter most; you can skip the benefits. Replace it for each new role: last week's posting will steer this week's answers.
What happens: Answers speak this role's language. The AI leans on the tools and responsibilities the posting names, and when a question could go several ways, it picks the angle this role cares about.
Interviewer asks: What does good deployment automation look like to you?
Example: no job description
"Every change should go through the same automated path: tests on every pull request, a build that produces one artifact, and a deploy that can be rolled back in one step. At Northwind we deployed the Django services to EC2 that way."
Example: Platform Engineer job description pasted
"For a platform team I would want pipelines defined as code in something like GitHub Actions, infrastructure changes planned and reviewed through Terraform, and deploys to Kubernetes rolled out gradually with automatic rollback on failed health checks. At Northwind I built the test-and-deploy flow for our Django services, and the same principles carry over."
This example has Answer beyond my resume switched off, so the answer names the posting's tools without claiming Arjun used them. The next switch decides that.
Answer beyond my resume
A switch under the job description, On by default. It decides what the AI says when a question asks about work your resume does not describe: a feature, a project or a tool.
| Setting | What happens |
|---|---|
| On (default, recommended) | Every question gets a confident, realistic answer about your work, even when your resume does not list that detail. Your employers, job titles and dates always stay as they are on your resume. |
| Off | Specific work sticks to what your resume shows. For a skill you have not listed, the AI explains it from the fundamentals and links it to the closest thing you have really done. |
Interviewer asks: Have you worked with Terraform?
Example: Off
"Terraform lets you declare infrastructure as code, keep state so it knows what already exists, and review a plan before anything changes. The closest thing I have done is managing our AWS setup for the Django services, where keeping EC2 and S3 configuration the same between staging and production was exactly the problem Terraform solves."
Example: On
"Yes. I have used Terraform to define our AWS environments as modules, so staging and production came from the same code with different variables. I kept remote state locked so two people could not apply at once, and every change went through a reviewed plan before apply."
Be ready for the follow-up
Your instructions (optional)
Up to 1,000 characters for anything the AI should know or do: what to emphasise, what to avoid, who the interviewer is. The placeholder gives the idea: e.g. Keep answers to two lines; use simple language, no jargon; the interviewer is the CTO.
What happens: Your instructions apply to every answer. When they set the length or tone, they win over the Style, Length and Tone settings, and the app shows a note under the box saying which settings they now control. They never override the honesty rules or the interview language.
Example
Instructions: "Lead with my checkout latency work whenever performance comes up. The interviewer is the Head of Platform. Do not mention Northwind by name."
Interviewer asks: How do you decide what to optimise first?
"I measure before I touch anything. On a checkout API I owned, p95 was around 800 milliseconds, and profiling showed two queries were most of it, so that is where I started. Fixing those and caching the settings they read brought it to about 250. For a platform team I would apply the same rule to build and deploy times."
Click Preview this under the box to see an answer written with your instructions, job description and current settings before the interview.
3. How the AI answers
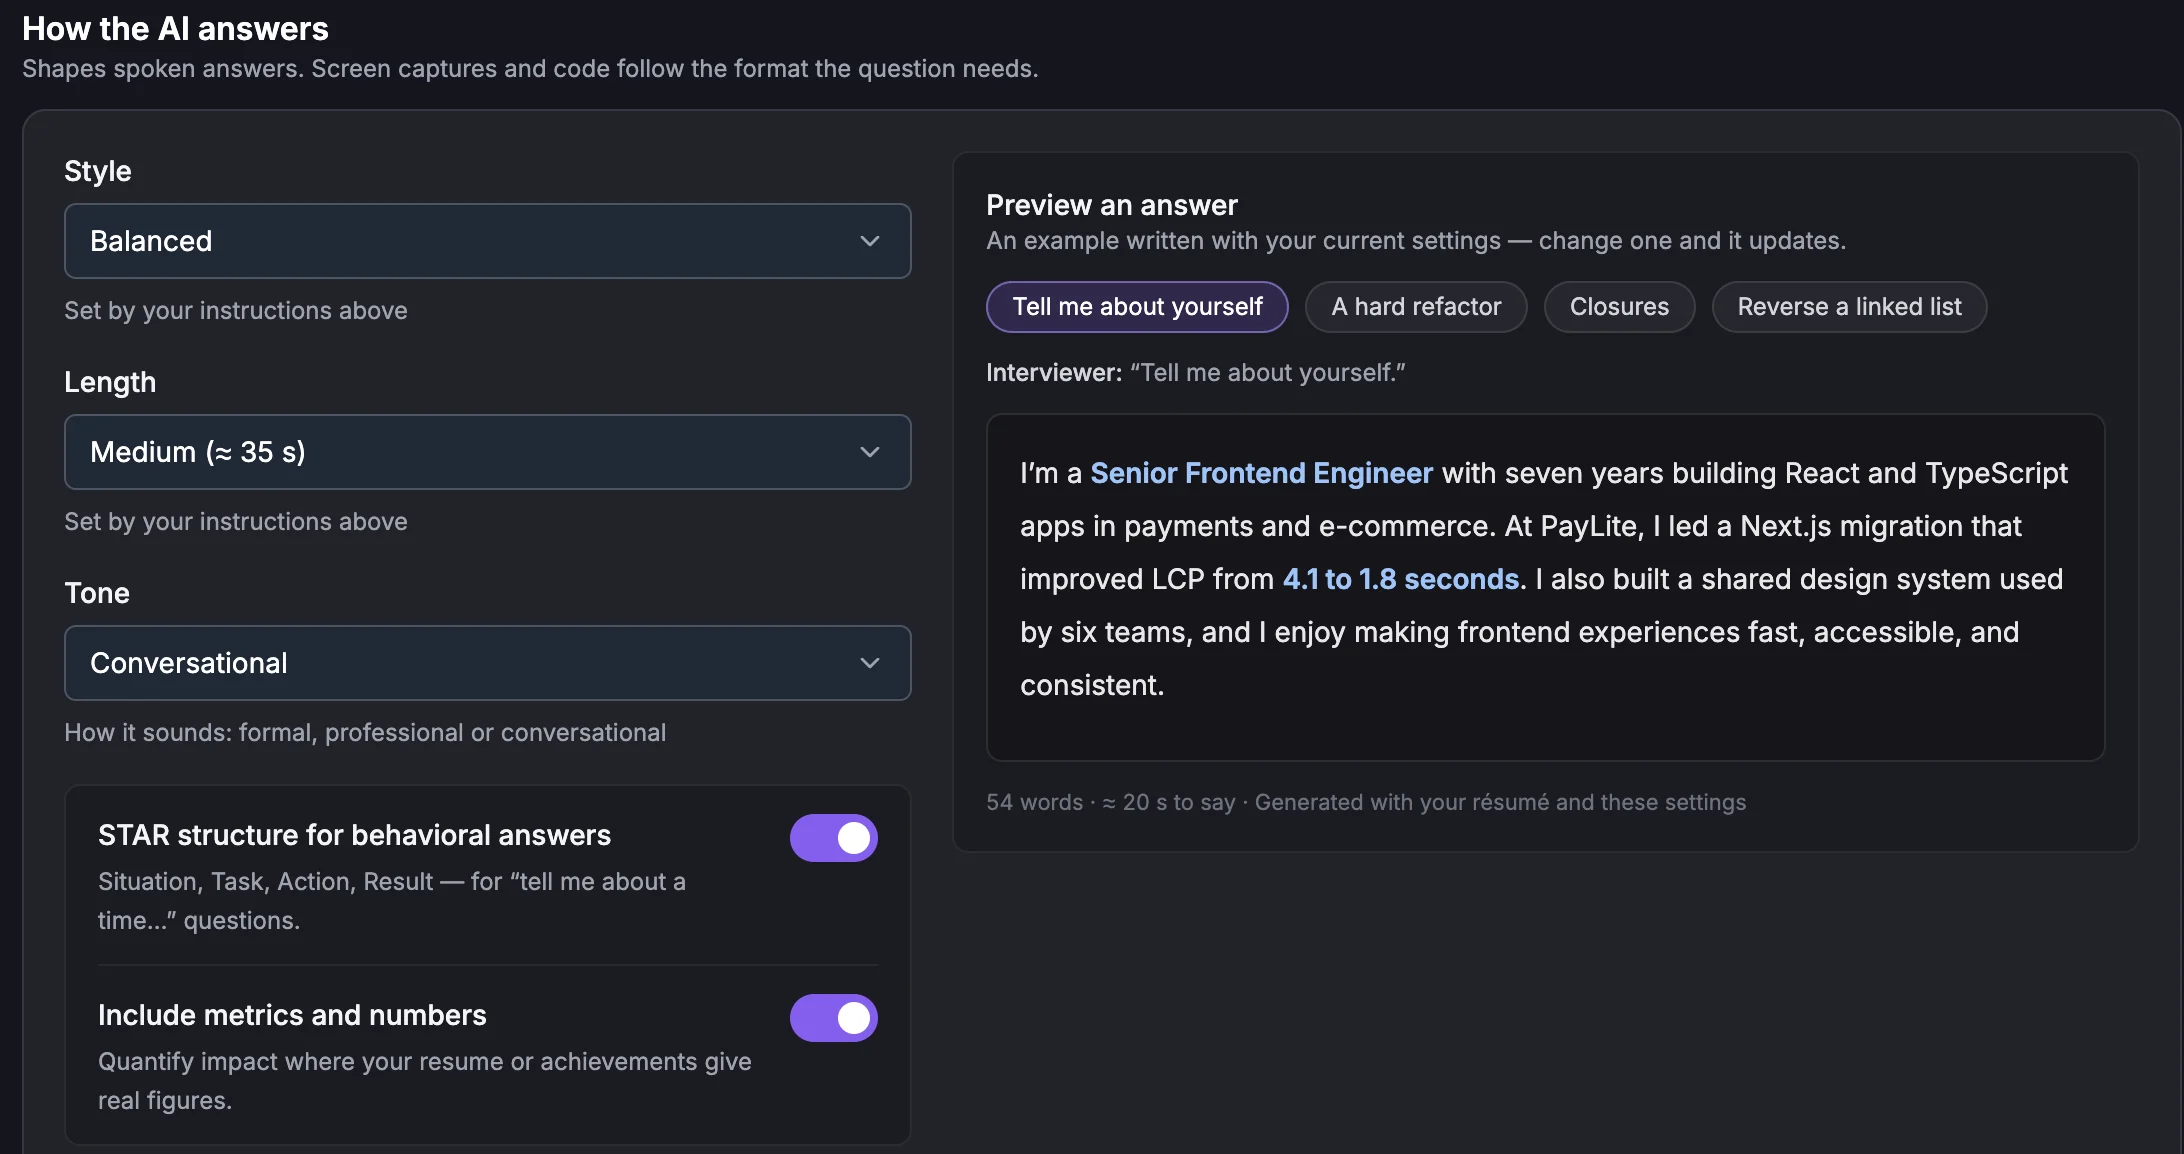
Style, Length and Tone
| Setting | What happens |
|---|---|
| Style | Concise (default): direct, no filler. Balanced: the answer plus brief support. Detailed: examples and depth. |
| Length | Short (≈ 20 s to say), the default: about 2 to 4 sentences. Medium (≈ 35 s): about 4 to 8. Long (≈ 50 s): about 8 to 14. Want even shorter? Write "two lines only" in Your instructions. |
| Tone | Formal, Professional (default) or Conversational. Professional suits most panels; Conversational reads more naturally in startup or culture-fit rounds. |
Interviewer asks: What is a Kubernetes readiness probe?
Example: Concise, Short, Professional
"A readiness probe tells Kubernetes when a pod can take traffic. Until it passes, the pod is kept out of the Service's endpoints, so users never hit an instance that is still starting up."
Example: Balanced, Medium, Conversational
"It is basically Kubernetes asking a pod, are you ready for traffic yet? Until the check passes, the pod stays out of the Service, so nobody gets routed to something that is still loading config or warming a cache."
"It is different from a liveness probe, which restarts a pod that has hung. I would point the readiness check at an endpoint that confirms the database connection is up."
STAR structure for behavioral answers
Situation, Task, Action, Result, for "tell me about a time..." questions. Off by default. When on, behavioral answers follow that order. Technical questions are not forced into it.
Interviewer asks: Tell me about a time something broke in production.
Example: STAR off
"We once had checkout timing out during a sale. I found a slow query, added an index and a cache, and it recovered. Since then I always load-test before big launches."
Example: STAR on
"During a sale weekend our checkout API started timing out (Situation). I was on call, so it was on me to get payments flowing again (Task). I traced it to two slow PostgreSQL queries, added the missing index and cached merchant settings in Redis (Action). Timeouts stopped within the hour, and p95 settled around 250 milliseconds, down from 800 (Result)."
The labels in brackets are added here to show the structure. The real answer reads as normal speech.
Include metrics and numbers
Off by default. When on, the AI works the real figures from your resume and Key achievements into answers. It does not make numbers up, so it only helps if you have figures on file.
Interviewer asks: What impact did your work have?
Example: metrics off
"I made our checkout API much faster, which cut timeouts and made the payment flow noticeably smoother for customers."
Example: metrics on
"I brought checkout API p95 latency down from 800 milliseconds to 250, more than three times faster, which is what stopped the timeouts during peak traffic."
Preview an answer
The Preview an answer panel writes an example answer with your current settings and your own resume. Pick a sample question from the chips, change a setting, and the example updates. You get 25 previews each time you open Interview Setup.
Auto-Response
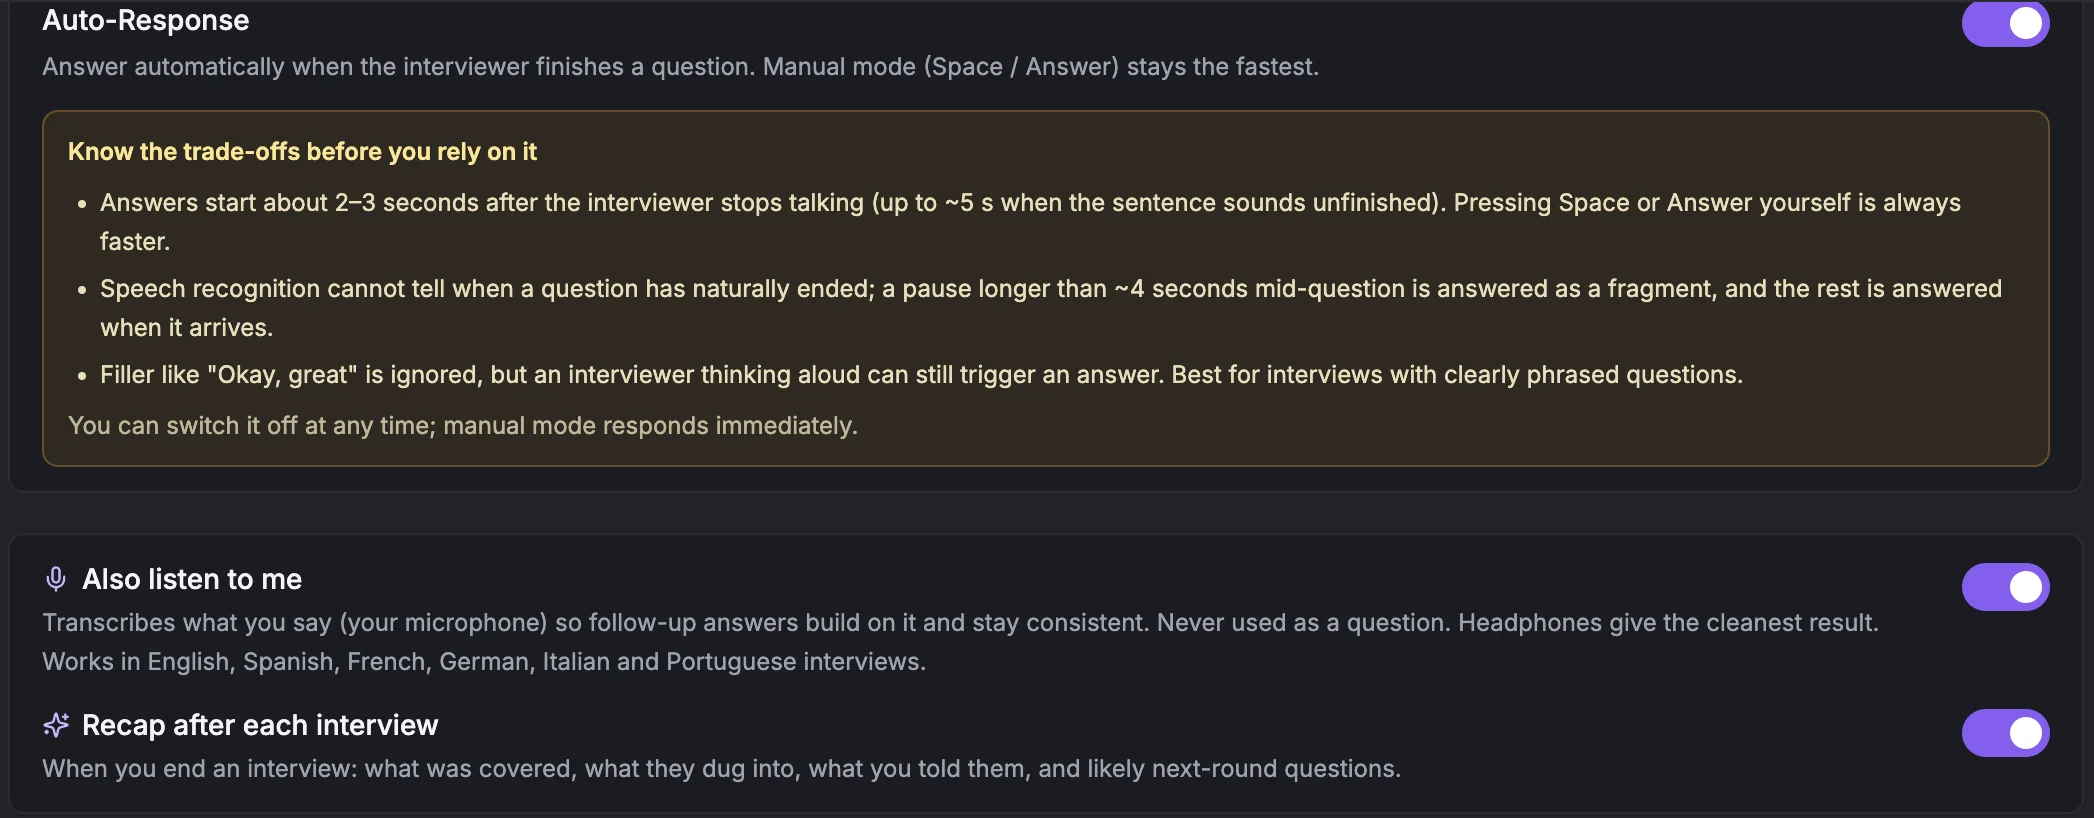
Decides whether an answer starts when you ask for it or by itself when the interviewer finishes a question. Off by default. While it is on, a red note headed Know the trade-offs before you rely on it shows under the switch. The setup wizard shows the same red note when you pick Automatically. From 5.3 this note is red, not amber, and it appears only while answers are set to appear automatically.
| Setting | What happens |
|---|---|
| Off (default) | Nothing is written until you ask. Press ⌘/Ctrl + Enter, ⌘/Ctrl + Space, or Space when the LastRound AI window is in front, or click Answer. The answer starts immediately, and you choose which questions get one. |
| On | An answer starts about 2 to 3 seconds after the interviewer stops talking, up to about 5 seconds when the sentence sounds unfinished. Filler such as "Okay, great" is ignored. |
| Trade-off | What it means |
|---|---|
| Slower than pressing Answer | The wait adds 2 to 3 seconds. Pressing Answer yourself is always faster. |
| Long pauses split a question | A pause longer than about 4 seconds mid-question is answered as a fragment, and the rest is answered when it arrives. |
| Thinking aloud can trigger it | It works best when the interviewer asks clearly phrased questions. |
Which to choose
Also listen to me
On by default. The app also transcribes your microphone, so follow-up answers build on what you actually said and stay consistent. What you say is never treated as a question. Headphones give the cleanest result. It works in English, Spanish, French, German, Italian and Portuguese interviews. If the app does not have microphone access yet, the row shows Allow microphone.
Recap after each interview
On by default. When you end an interview you get a one-page recap: what was covered, what they dug into, what you told them, and likely next-round questions. See Your interview recap.
4. About you
About you has four cards: your profile, Questions interviewers ask you, Prepared answers and Memory of previous interviews. The last two have their own sections below.
| Field | What happens when you set it |
|---|---|
| Full name | The AI knows your name, so "Arjun, tell us about yourself" gets an answer that sounds like you. |
| Current role | Your title today. "So you're a backend engineer now?" gets an answer that matches it. |
| Target role | The title you want. With Platform Engineer set, "Why this role?" is answered as a move toward platform work. |
| Target company (optional) | Answers can mention the company when it is relevant, for example why its product appeals to you. |
| Years of experience | Fresher (0 years) to 20+ years. Sets how senior the answers sound: a fresher talks about projects and learning, 10 years talks about trade-offs and leading others. |
| Industry | Frames examples for that sector. |
| Skills | Type a skill and press Enter or click Add. Headline skills you want mentioned even if the resume buries them. |
| Key achievements | Free text, for example "Cut checkout p95 from 800 ms to 250 ms; led a 3-person migration". These are the figures Include metrics and numbers draws on. |
Questions interviewers ask you
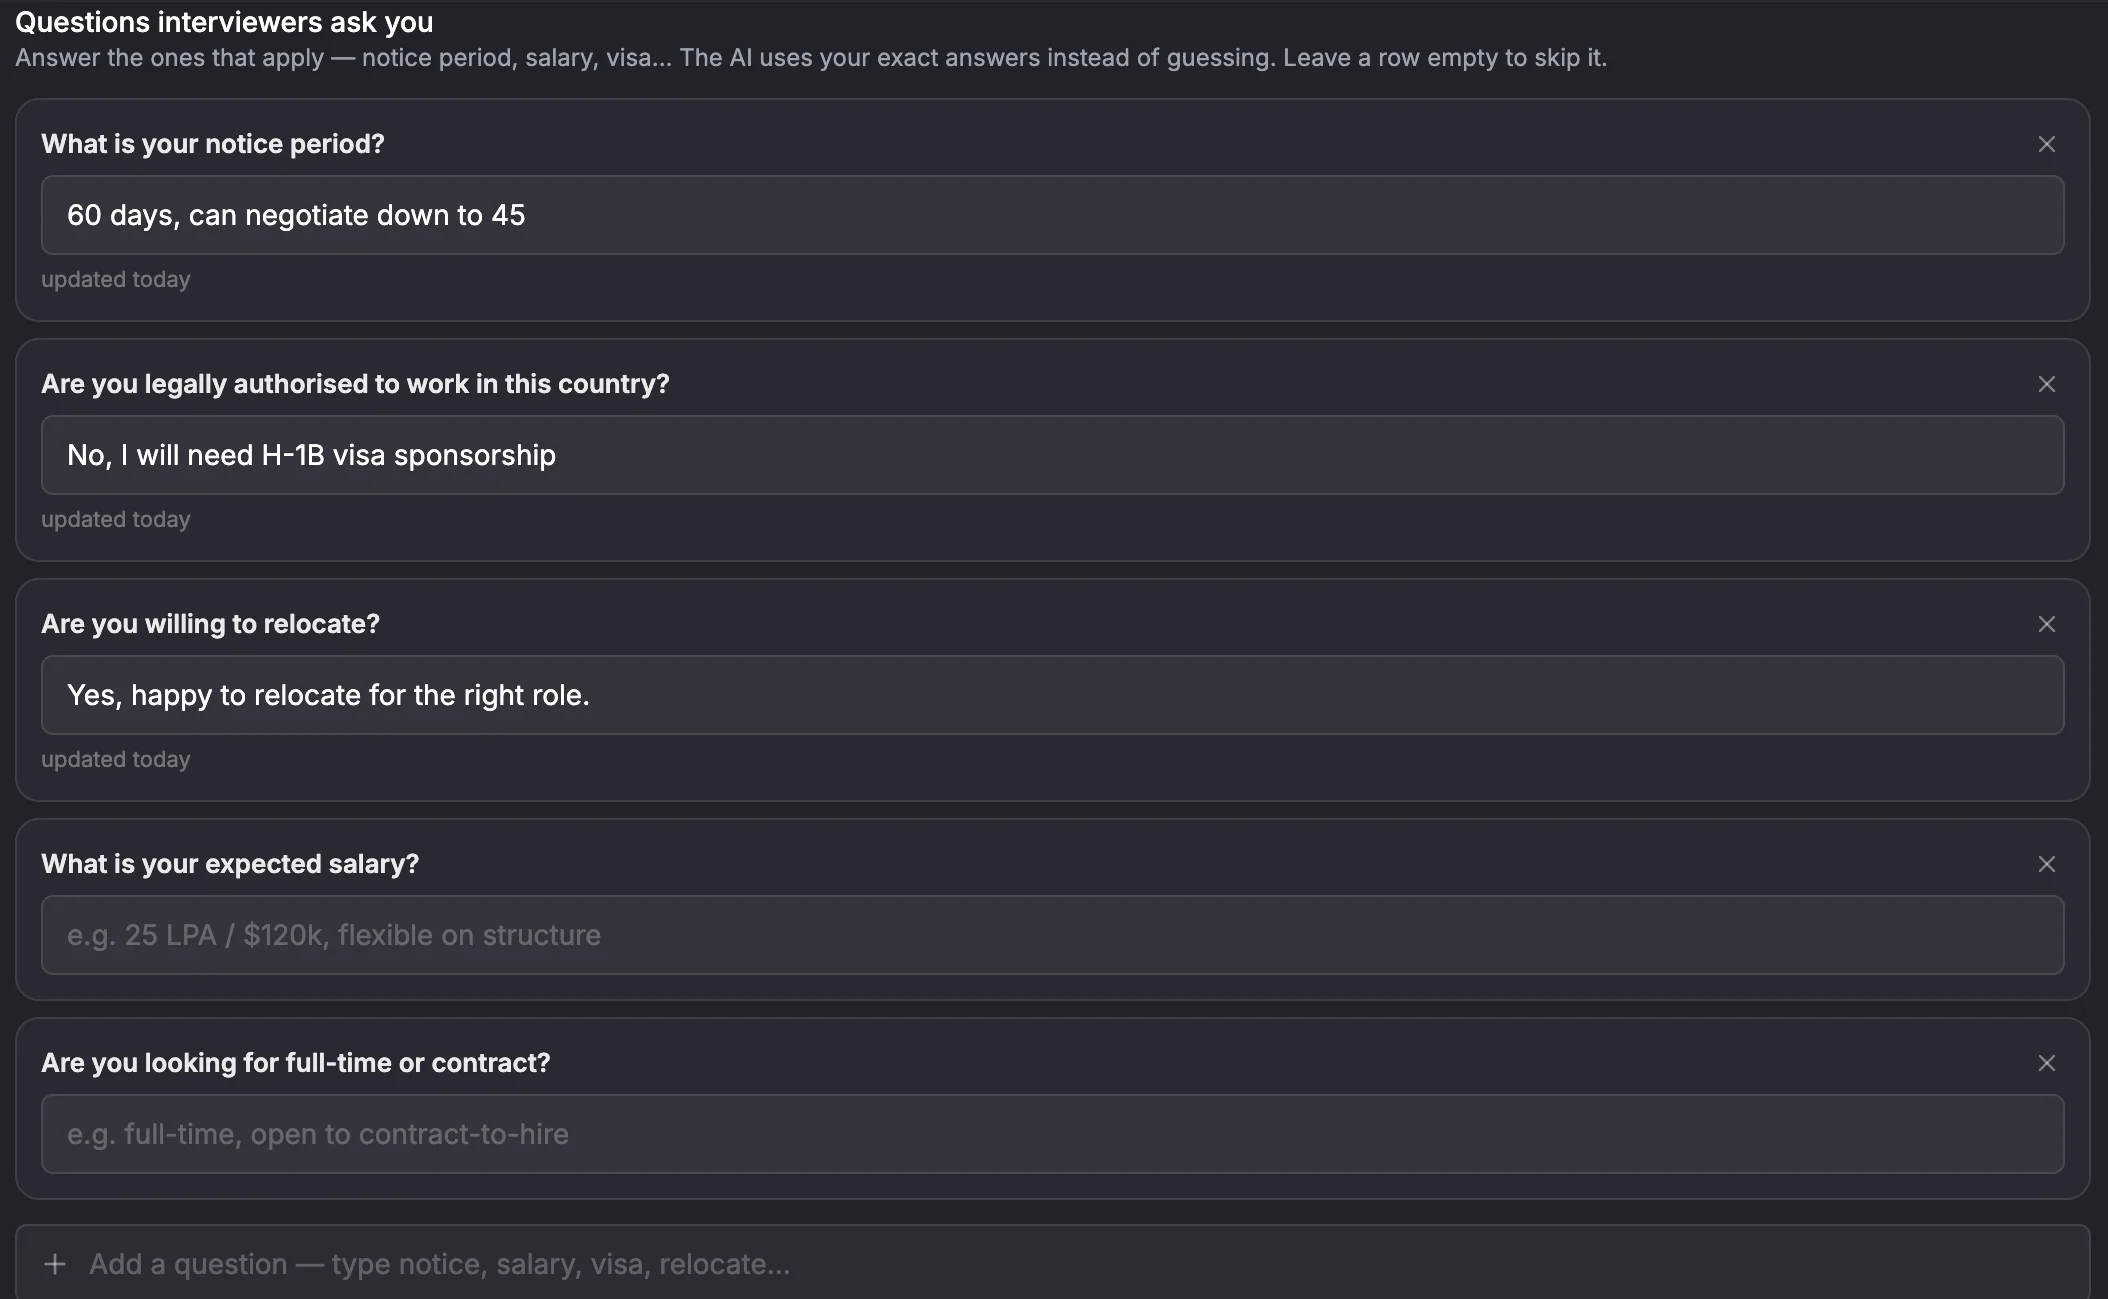
Your notice period, salary expectation or visa status are not on your resume, and a copilot that guesses them is worse than one that says nothing. Write them here once, and the AI uses your exact answers instead of guessing.
- The common ones come first: notice period, expected salary, right to work, full-time or contract, relocation. Type your answer the way you would say it, for example 60 days, can negotiate down to 45. Leave a row empty to skip it.
- Three empty rows show at a time. Show N more unanswered opens the rest, and Remove all unanswered clears the ones you will never need.
- Add a question suggests common questions as you type (notice, salary, visa, relocate...), or adds your own.
- Each answer shows when you last updated it. After 30 days a Still right? chip reminds you to check it.
- Keep the whole list under 1,500 characters; the AI reads the first 1,500.
- Used for spoken questions and questions you type in Ask, not for screen captures.
Example
Arjun's answer: Notice period: "60 days, can negotiate down to 45."
Interviewer asks: When could you start?
"My notice period is 60 days, but I can negotiate it down to 45 if the timing matters for the team."
5. Prepared answers
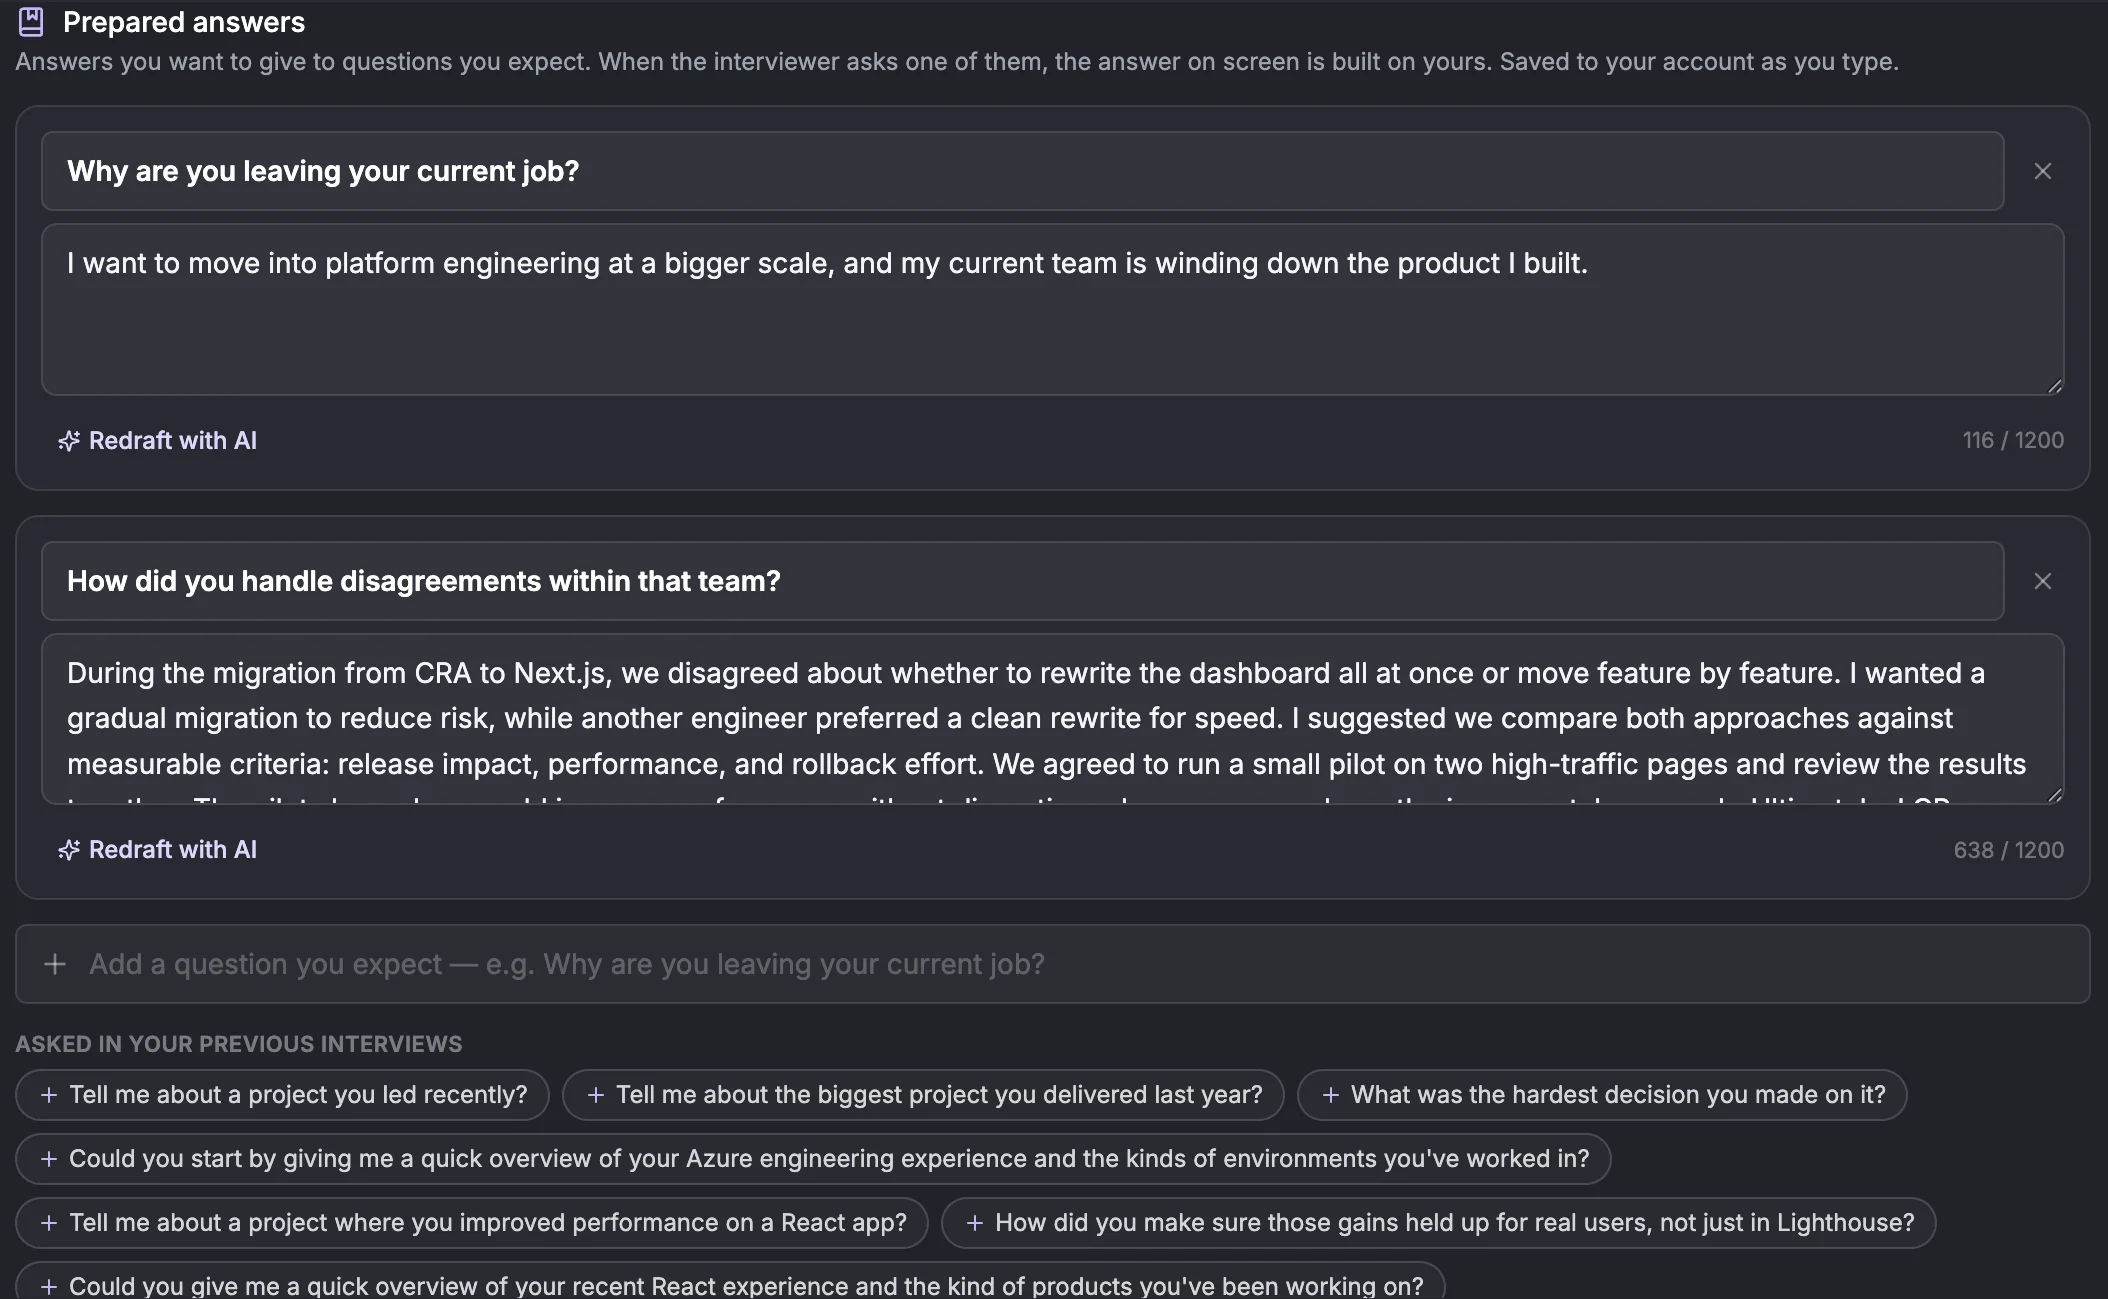
Step 1: Add a question you expect
Type it in Add a question you expect, or click a suggestion. Asked in your previous interviews lists real questions from your recent sessions, and From your last interview recap lists the questions your recap predicted.Step 2: Write the answer, or let the AI draft it
Write it in your own words, or click Draft with AI. It writes a first version from your resume, the job description and your role, and you edit it until it sounds like you. Redraft with AI tries again.Step 3: Nothing else to do
Prepared answers save to your account as you type. In the interview, when a question closely matches one of yours, the AI builds the answer on what you wrote and adjusts it to how the question was phrased. If nothing matches, you get a normal answer.
| Detail | |
|---|---|
| How many | Up to 30, each with a question up to 200 characters and an answer up to 1,200. |
| Where they apply | Spoken questions and questions typed in Ask. Not screen captures. |
| Cost and speed | Nothing extra. Matching happens on your computer and does not slow the answer down. |
| From the recap | Every likely next-round question in your recap has Save to Prepared answers. |
6. Memory of previous interviews

| You want to | Do this |
|---|---|
| See what it remembers | Open this card, or look at the right side of the Confirm interview details screen (Based on your previous interview sessions). Show all opens the full text. |
| Correct something | Edit, change the text, then save. It is plain text, up to 1,500 characters. |
| Leave it out | Switch off Use my previous interviews in answers, here or on the Confirm screen. |
| Forget everything | Clear, then confirm Forget all previous sessions? |
Within a single interview the AI also remembers what has been said: the most recent exchanges word for word and a short note of everything before them. So an answer in minute 40 does not contradict a tool or number you gave in minute 5. That note is cleared when you end the interview.
Keep on this device only means no memory
7. Behavioral stories (optional)
| Field | Write about |
|---|---|
| Leadership experience | A time you led a team or project. |
| Challenging situation | A difficult problem you solved. |
| Teamwork example | A successful team collaboration. |
| Problem-solving approach | How you break down complex problems. |
Example
Leadership experience: "Led a 3-person effort to move our jobs from cron on one EC2 box to a queue with retries. Wrote the plan, split the work, ran the cutover on a weekend. No missed jobs after the switch."
Interviewer asks: Tell me about a time you led a project.
"Our scheduled jobs all ran from cron on a single EC2 machine, so one bad deploy could silently skip payouts. I proposed moving them onto a queue with retries, wrote the plan, and split the work across three of us. We ran the cutover on a weekend with the old jobs still in place as a fallback, and after the switch we did not miss a single job."
Write them the way you would tell them
8. Preferred coding language
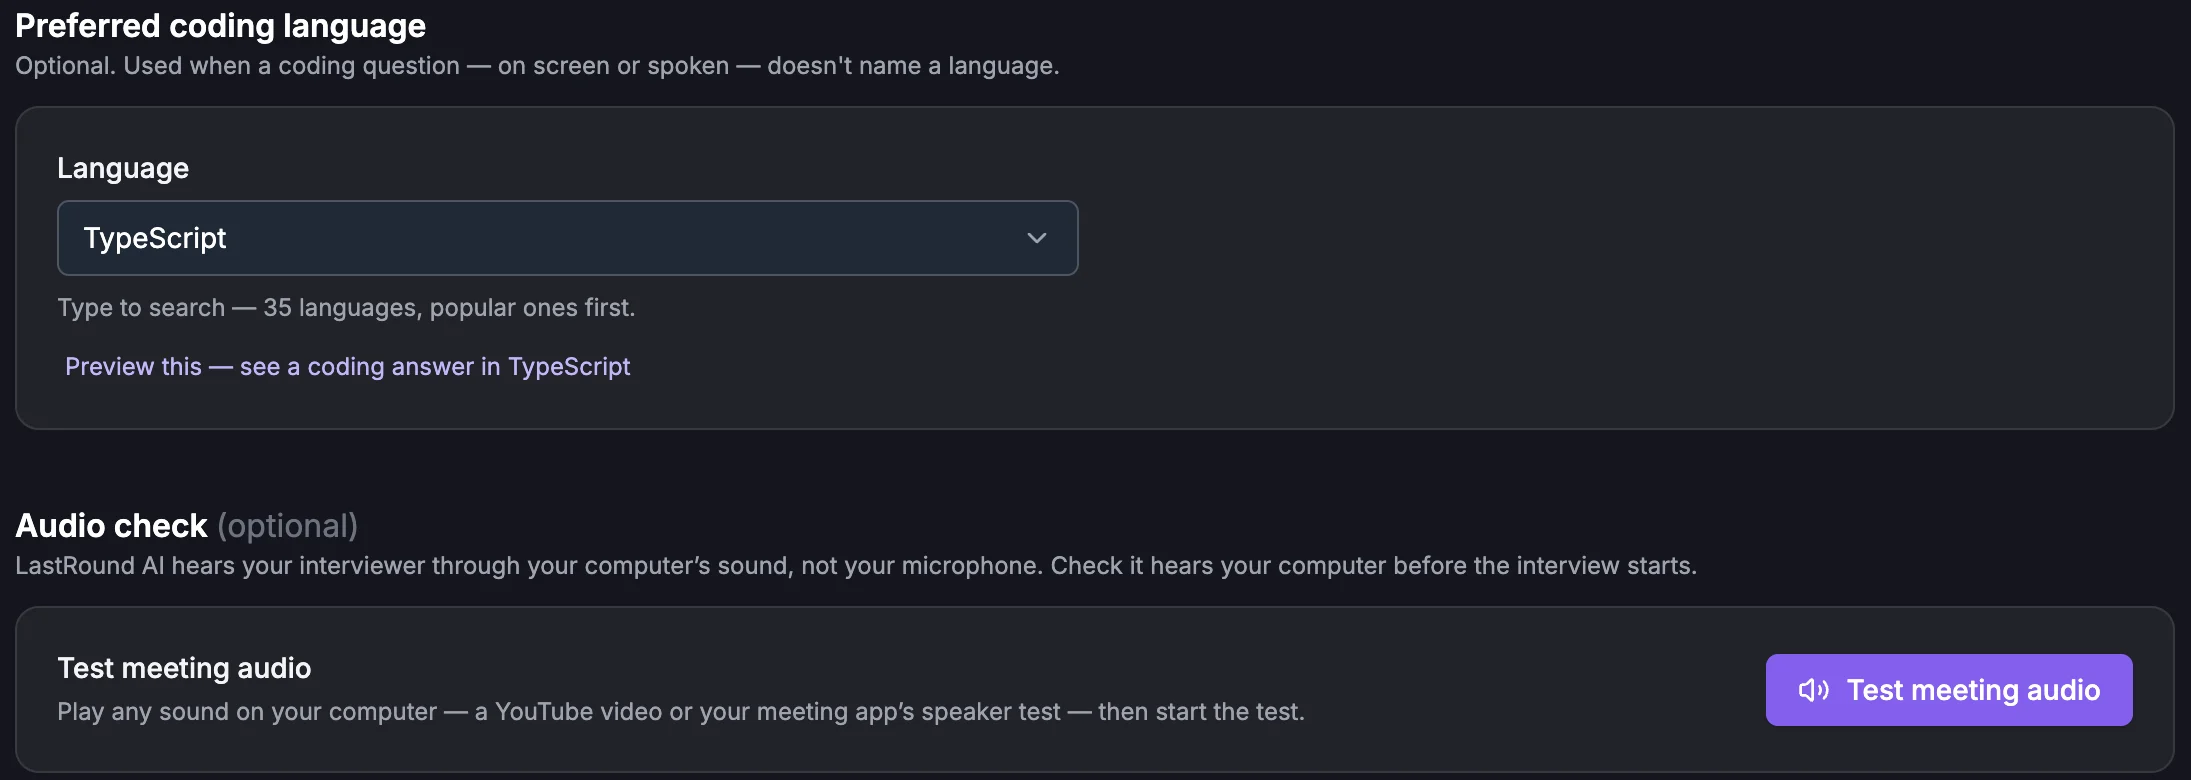
- Language is searchable: 35 languages, popular ones first.
- No preference (the default): code is written in the language selected in the editor on screen, or in Python if the screen shows none.
- Preview this under the picker shows a coding answer in the language you chose.
9. Audio check (optional)
Step 1: Play a sound on your computer
Anything will do: a YouTube video, or your meeting app's speaker test.Step 2: Click Test meeting audio
A level meter shows what the app hears. It captures sound exactly as a live interview does, but only on your computer: nothing is transcribed or sent, and it uses no credits. It stops by itself after about 20 seconds.Step 3: Read the result
We can hear your computer's audio means your interview will be captured the same way; keep the meeting on the same speaker or headset. We can't hear anything lists fixes for your system (below). Fix one thing, then click Test again.
| System | What to check |
|---|---|
| macOS | Make sure the sound plays on this Mac and the Mac is not muted. Turn on LastRound AI in System Settings → Privacy & Security → Screen & System Audio Recording. If you allowed it recently, quit LastRound AI completely and open it again: macOS applies the permission only after a restart. |
| Windows | The check names the output device LastRound AI listens to. If your meeting app plays through a different device, set the meeting app's speaker to that device, or make the other device the default in Windows Sound settings. |
| Very quiet sound | Turn the volume up in the video or meeting app and in your computer's sound settings, then test again. |
Not available during an interview
Confirm interview details
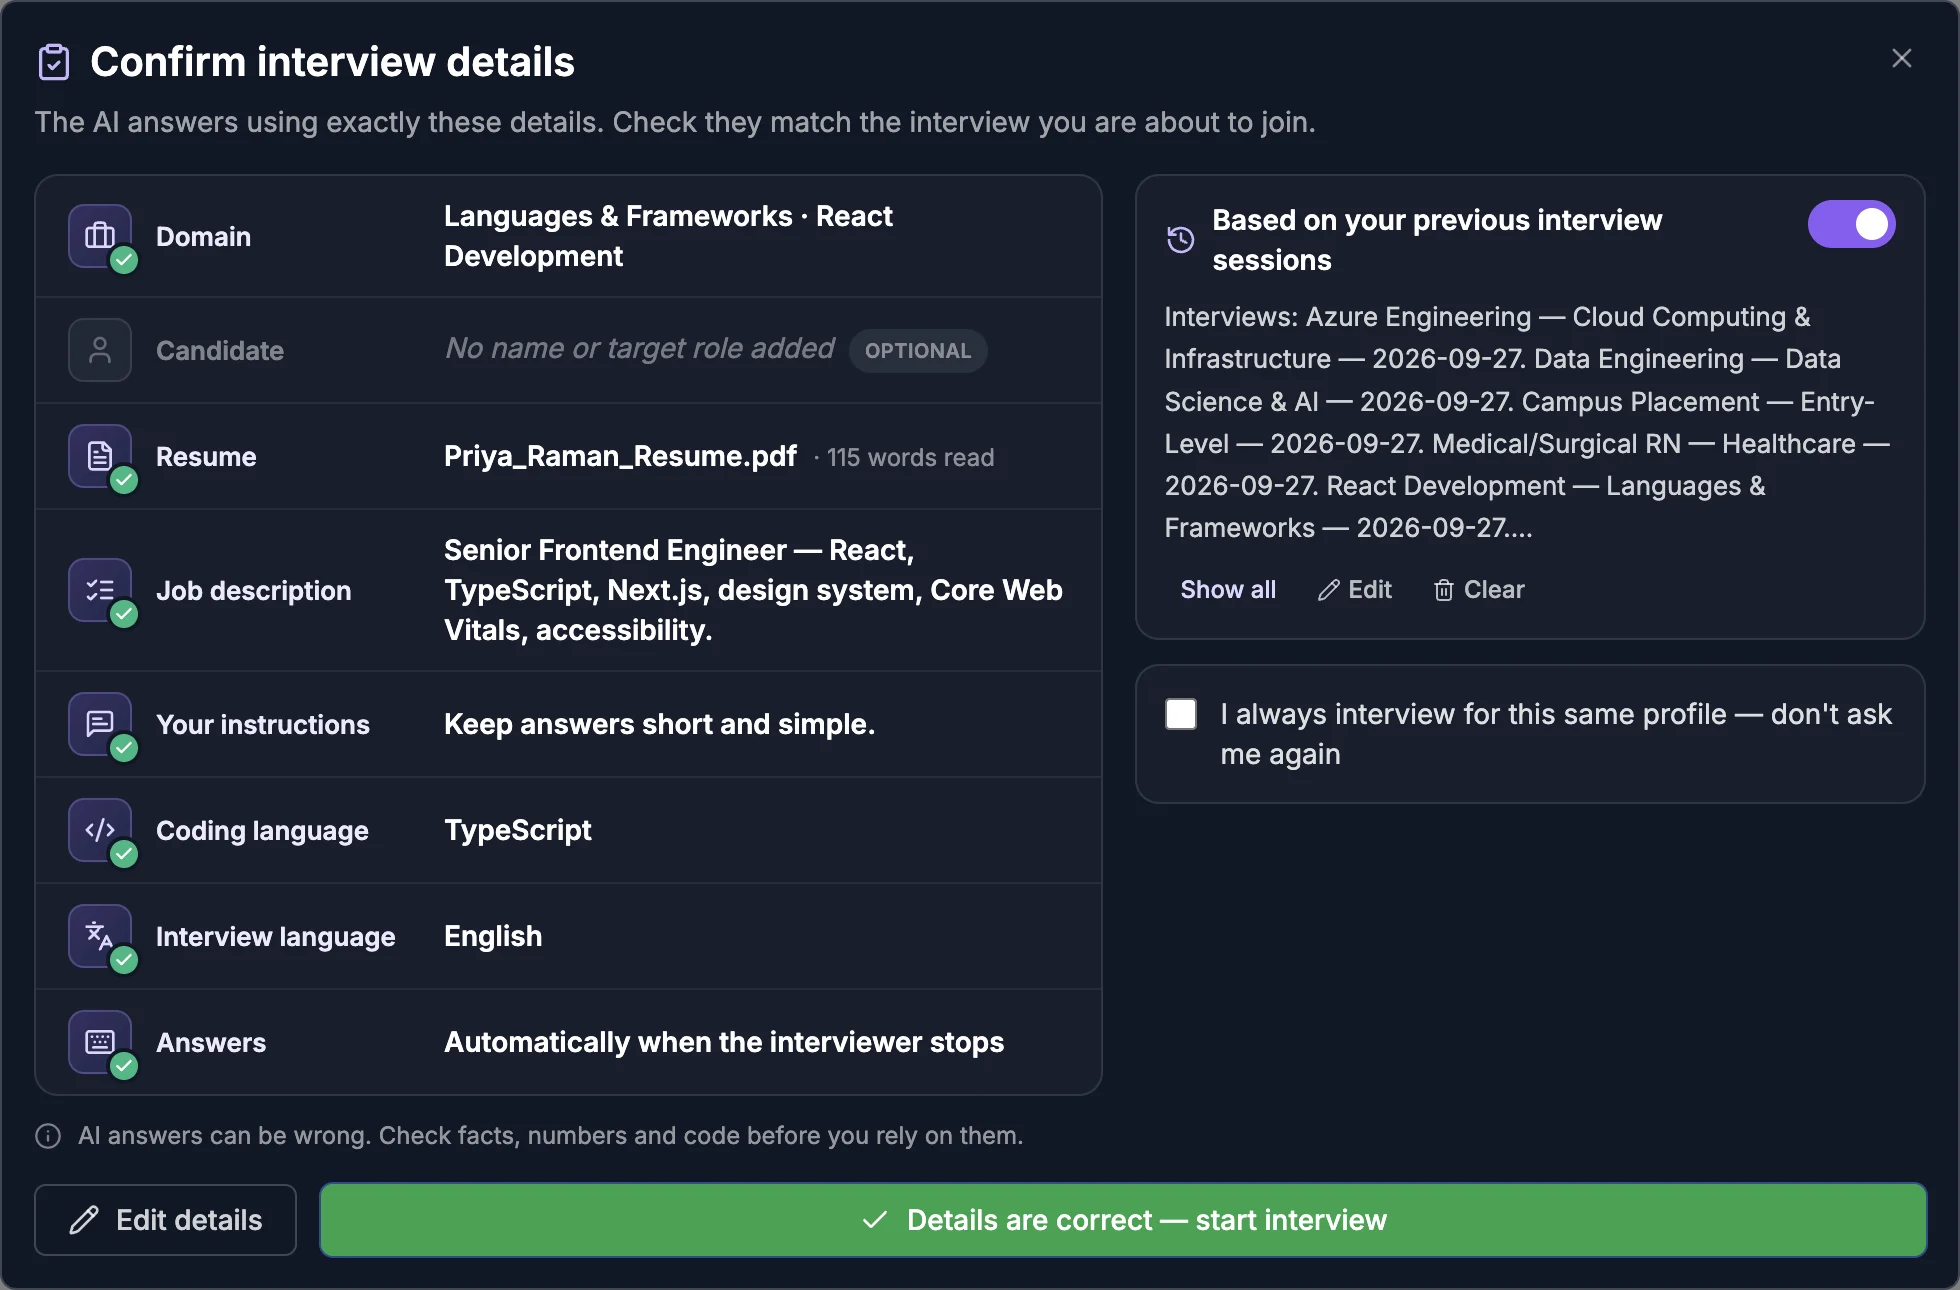
| Row | What it shows |
|---|---|
| Domain | Your category and domain. Marked Required; you cannot start without it. |
| Candidate | Your name, target role and target company from About you. |
| Resume | The file the AI will answer from and how many words were read, or Hard to read if little text came through. |
| Job description | The start of the pasted posting. |
| Your instructions | The start of your instructions. |
| Coding language | Only if you set a preferred coding language. |
| Interview language | The language for the transcript and the answers. |
| Answers | When you press Answer (⌘ + Enter, ⌘ + Space or Space), or Automatically when the interviewer stops. |
The right side shows what the AI remembers from your previous interviews, with the switch to leave it out this time. Edit details takes you back to Interview Setup. Details are correct — start interview starts the interview, and only then is anything billed. On your first interview the screen also reminds you that AI answers can be wrong, so check facts, numbers and code before you rely on them.
Example
Yesterday Arjun interviewed for a Backend Developer role. Today it is the Platform Engineer interview, but he forgot to change the setup. The confirm screen shows the Backend Development domain and yesterday's job description. He clicks Edit details, switches the domain to Kubernetes Engineering, pastes the new posting, and starts with the right profile before a single credit is used.
"I always interview for this same profile"
Tick I always interview for this same profile — don't ask me again if you only ever interview for one profile. Interviews then start straight away with the same details, so update Interview Setup before you start if you switch role or company.
- It comes back on its own when the category, domain, name, target role, target company, resume, job description, your instructions, coding language or interview language changes.
- Answer mode does not count. Switching Auto-Response on or off changes when answers appear, not what they say.
- You can turn it back on with Turn back on under Settings → General → Before each interview.
How your settings reach an answer
| If these disagree | This wins |
|---|---|
| Resume vs About you | The resume. About you only fills gaps the resume leaves. |
| Your instructions vs Style, Length or Tone | Your instructions, on the points they cover. |
| Your instructions vs the honesty rules | The honesty rules. The AI never invents employers, job titles or dates that are not on your resume. |
| Your instructions vs Interview language | Interview language. To get answers in Spanish, set Interview language to Spanish rather than writing "answer in Spanish". |
| A prepared answer vs a fresh answer | Your prepared answer, when the question matches it closely enough. |
Changes apply from your next answer. An answer already on screen is not rewritten.
| Button | What it does |
|---|---|
| Save | Saves everything. A message confirms Interview setup saved. The AI uses it from your next answer. |
| Cancel | Closes without saving your edits. Your resume, prepared answers and memory edits are kept anyway, because they save the moment you make them. |
| Reset profile | The small link at the bottom left. After a confirmation it clears your name, role, skills, achievements and behavioral stories. Your resume and interview settings are kept. Use Remove in Your resume if you want the resume gone too. |
Saved to your account
Your Interview Setup is saved to your LastRound AI account and comes back by itself when you sign in: after a reinstall, after an update, or on another computer. The line above the buttons says Saved to your account when that has happened.
- Two computers: edits merge field by field. If you change the same field on both, the latest edit wins.
- Offline: your setup keeps working, and the account copy updates when you are back online.
Keep on this device only means nothing on our servers
Ready to go?
Still stuck?
Signed in? Open a ticket under Account → Support in the app. Otherwise use the contact form or email. Tell us what you tried, which page of this guide you were on, and your operating system or browser.
We get back to you within 24 hours.