
Live Interview Copilot
The complete reference for the desktop copilot: how Live and Code mode work, what every toolbar control does, how answers are generated, what a session costs, what the copilot remembers, and exactly what stealth does and does not hide.
Pick the right copilot
| Copilot | Best for |
|---|---|
| Desktop app | Video interviews on Zoom, Google Meet or Microsoft Teams and coding rounds. Hears the meeting audio and your microphone directly, and the overlay is excluded from screen sharing and recording. |
| Browser Live Copilot | When you cannot install the desktop app. Runs at app.lastroundai.com and listens to the meeting through a shared browser tab. It is a normal browser tab, so do not share your entire screen with it open. |
| Mobile Copilot | Phone interviews and in-person rounds. Open the web app on your phone; it listens through the phone microphone and shows answers as text. |
Be honest with yourself about the rules
How Live mode works
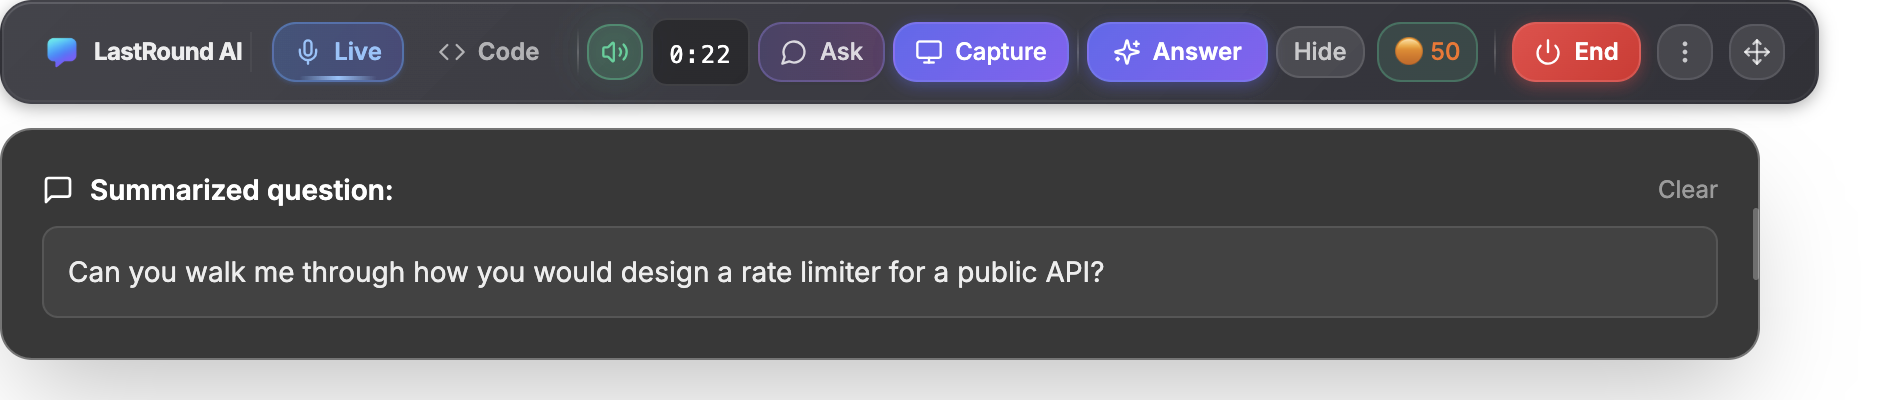
- The app captures your computer's audio. Whatever the meeting is playing through your speakers or headset is captured at the system level. There is nothing to route, no virtual audio device to install, and you do not need to add the app to the call.
- That audio is transcribed as it arrives. The interviewer's words appear in the panel while they are still speaking.
- The question is condensed into a Summarized question: line. This is your check that the copilot understood. If it summarised the wrong thing, that is the moment to fix it with Ask rather than reading out an answer to a question nobody asked.
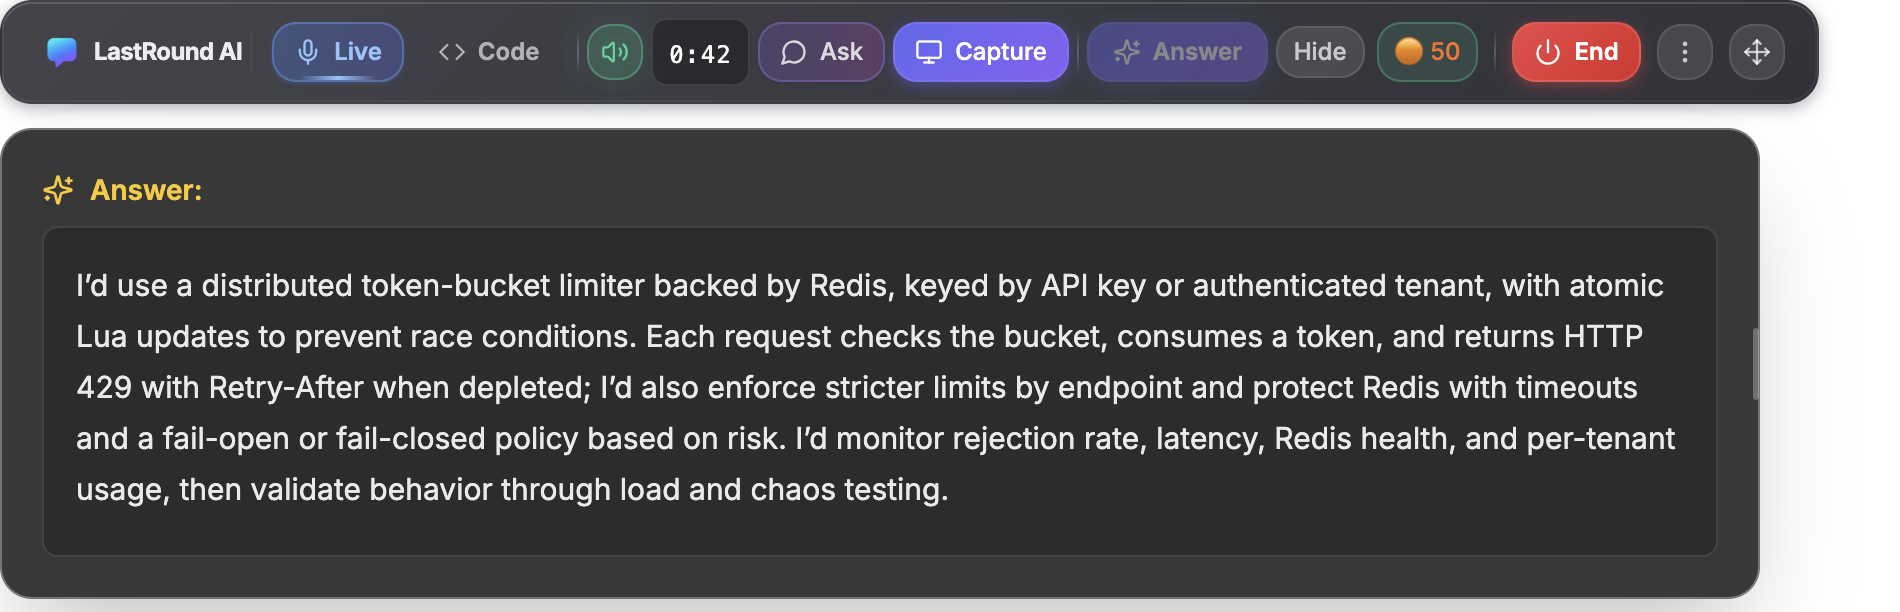
- The answer is generated from that transcript. It streams into the panel underneath, written in the first person so you can read it out.
The interviewer hears nothing
If you mute the meeting, there is nothing to transcribe
Every control on the toolbar
| Control | What it does |
|---|---|
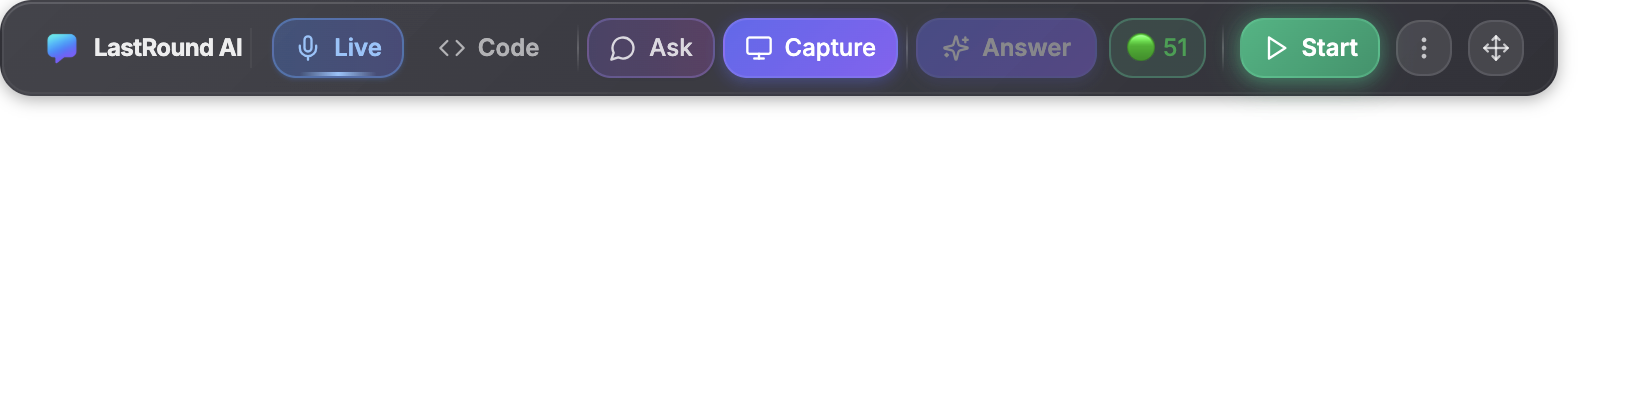
| Live | Spoken interview mode, tooltip Live Interview. Transcribes the meeting audio and answers from the transcript. This is the default mode. |
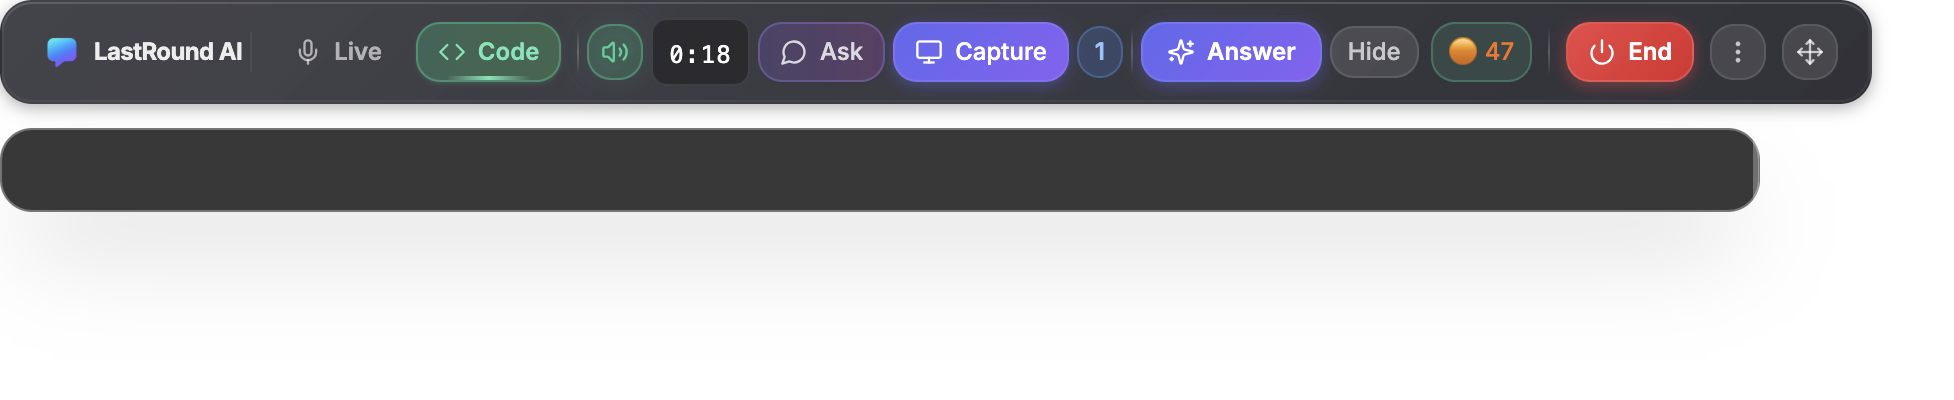
| Code | Coding round mode, tooltip Coding Interview. Answers from screenshots of the problem on your screen; transcription is not required for a screenshot answer. |
| Ask | Type your own question or instruction instead of using the transcript. It expands into a field with the placeholder Type your question... and the overlay widens to make room. Its own section below covers when to reach for it and how the answer differs. |
| Capture | Add a screenshot of your screen to the queue. Greyed out in Code mode until you press Start. |
| The badge on Capture | The number of screenshots currently queued, shown as a plain count on the button, so you can tell at a glance whether the whole problem statement is in. Click the badge to open the Screenshots panel, which shows the count in its heading and has a Clear All button. |
| Answer | Generate an answer from whatever is available: the transcript in Live mode, the queued screenshots in Code mode, or a typed Ask prompt. Greyed out when there is nothing to answer. While the answer streams the same button reads Stop, which cuts a long answer short. |
| Hide / Show | Appears once a session is running. Hide collapses the answer panel down to the toolbar and the button then reads Show. The session keeps running either way. |
| The credit pill | Your current balance: a coloured dot and the number, the dot moving from green through orange and yellow to red as the balance falls. It reads Low! when you are nearly out and No credits! at zero, and an Add button, then a Subscribe button, appear beside it. Running out mid-interview has its own section below. |
| The session timer | Appears next to the mode buttons once a session is running, counting up in minutes and seconds. This is the number your credits are calculated from. The speaker icon beside it pauses and resumes audio capture (Pause Audio / Resume Audio), and a REC chip appears while a session is being recorded to this device. |
| Start / End | Start opens the session and begins billing, stepping through Initiating…, Connecting…, Capturing… and Almost ready… as it connects. It then becomes a red End, which closes the session and settles the credits. Neither button asks for confirmation, so treat End as final. |
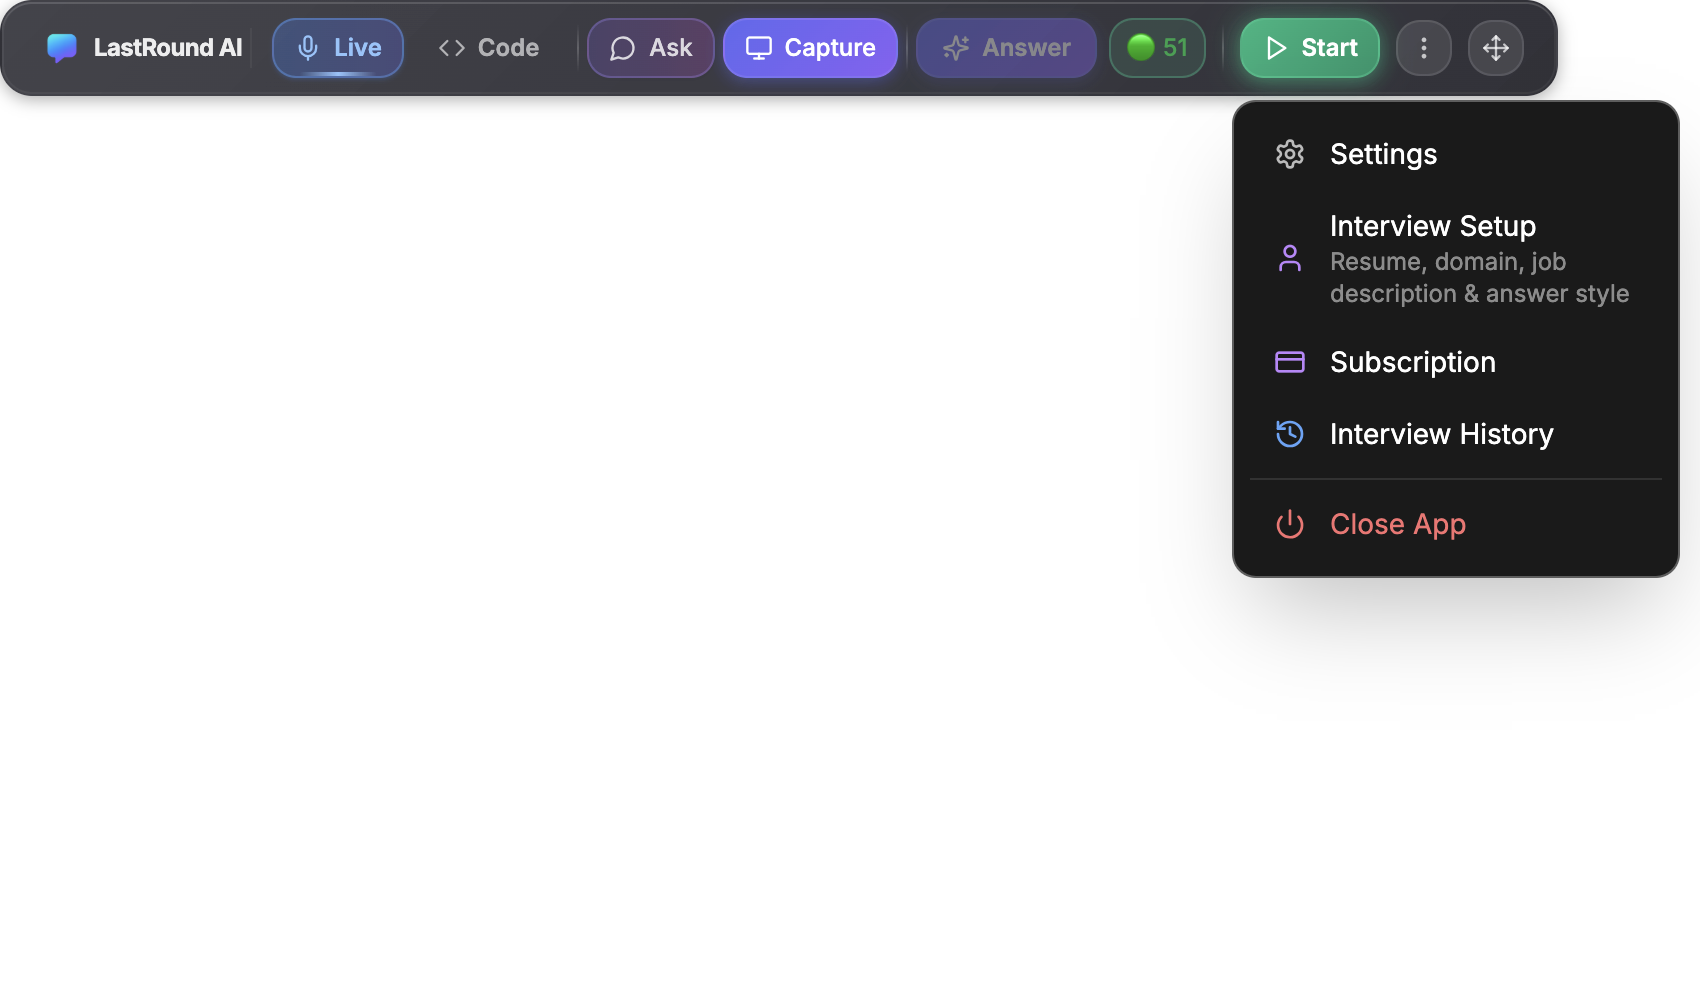
| ⋮ (Quick Settings) | Settings, Interview Setup (Resume, domain, job description & answer style), Subscription, Interview History (opens the web app) and Close App. |
| The move handle | Drag to move the overlay. ⌘/Ctrl and the arrow keys do the same from the keyboard, which is safer during a shared screen because your mouse pointer is still visible to the other side. |
Use the keyboard, not the mouse
Running a Live session
Step 1: Check Interview Setup says Ready
Open ⋮ → Interview Setup. The header pill must read Ready to start an interview, which means a resume is uploaded and Interview category and Specific domain are chosen. Paste this role's job description while you are there, and pick the answer length and tone you want to read out. The Interview Setup guide explains every field.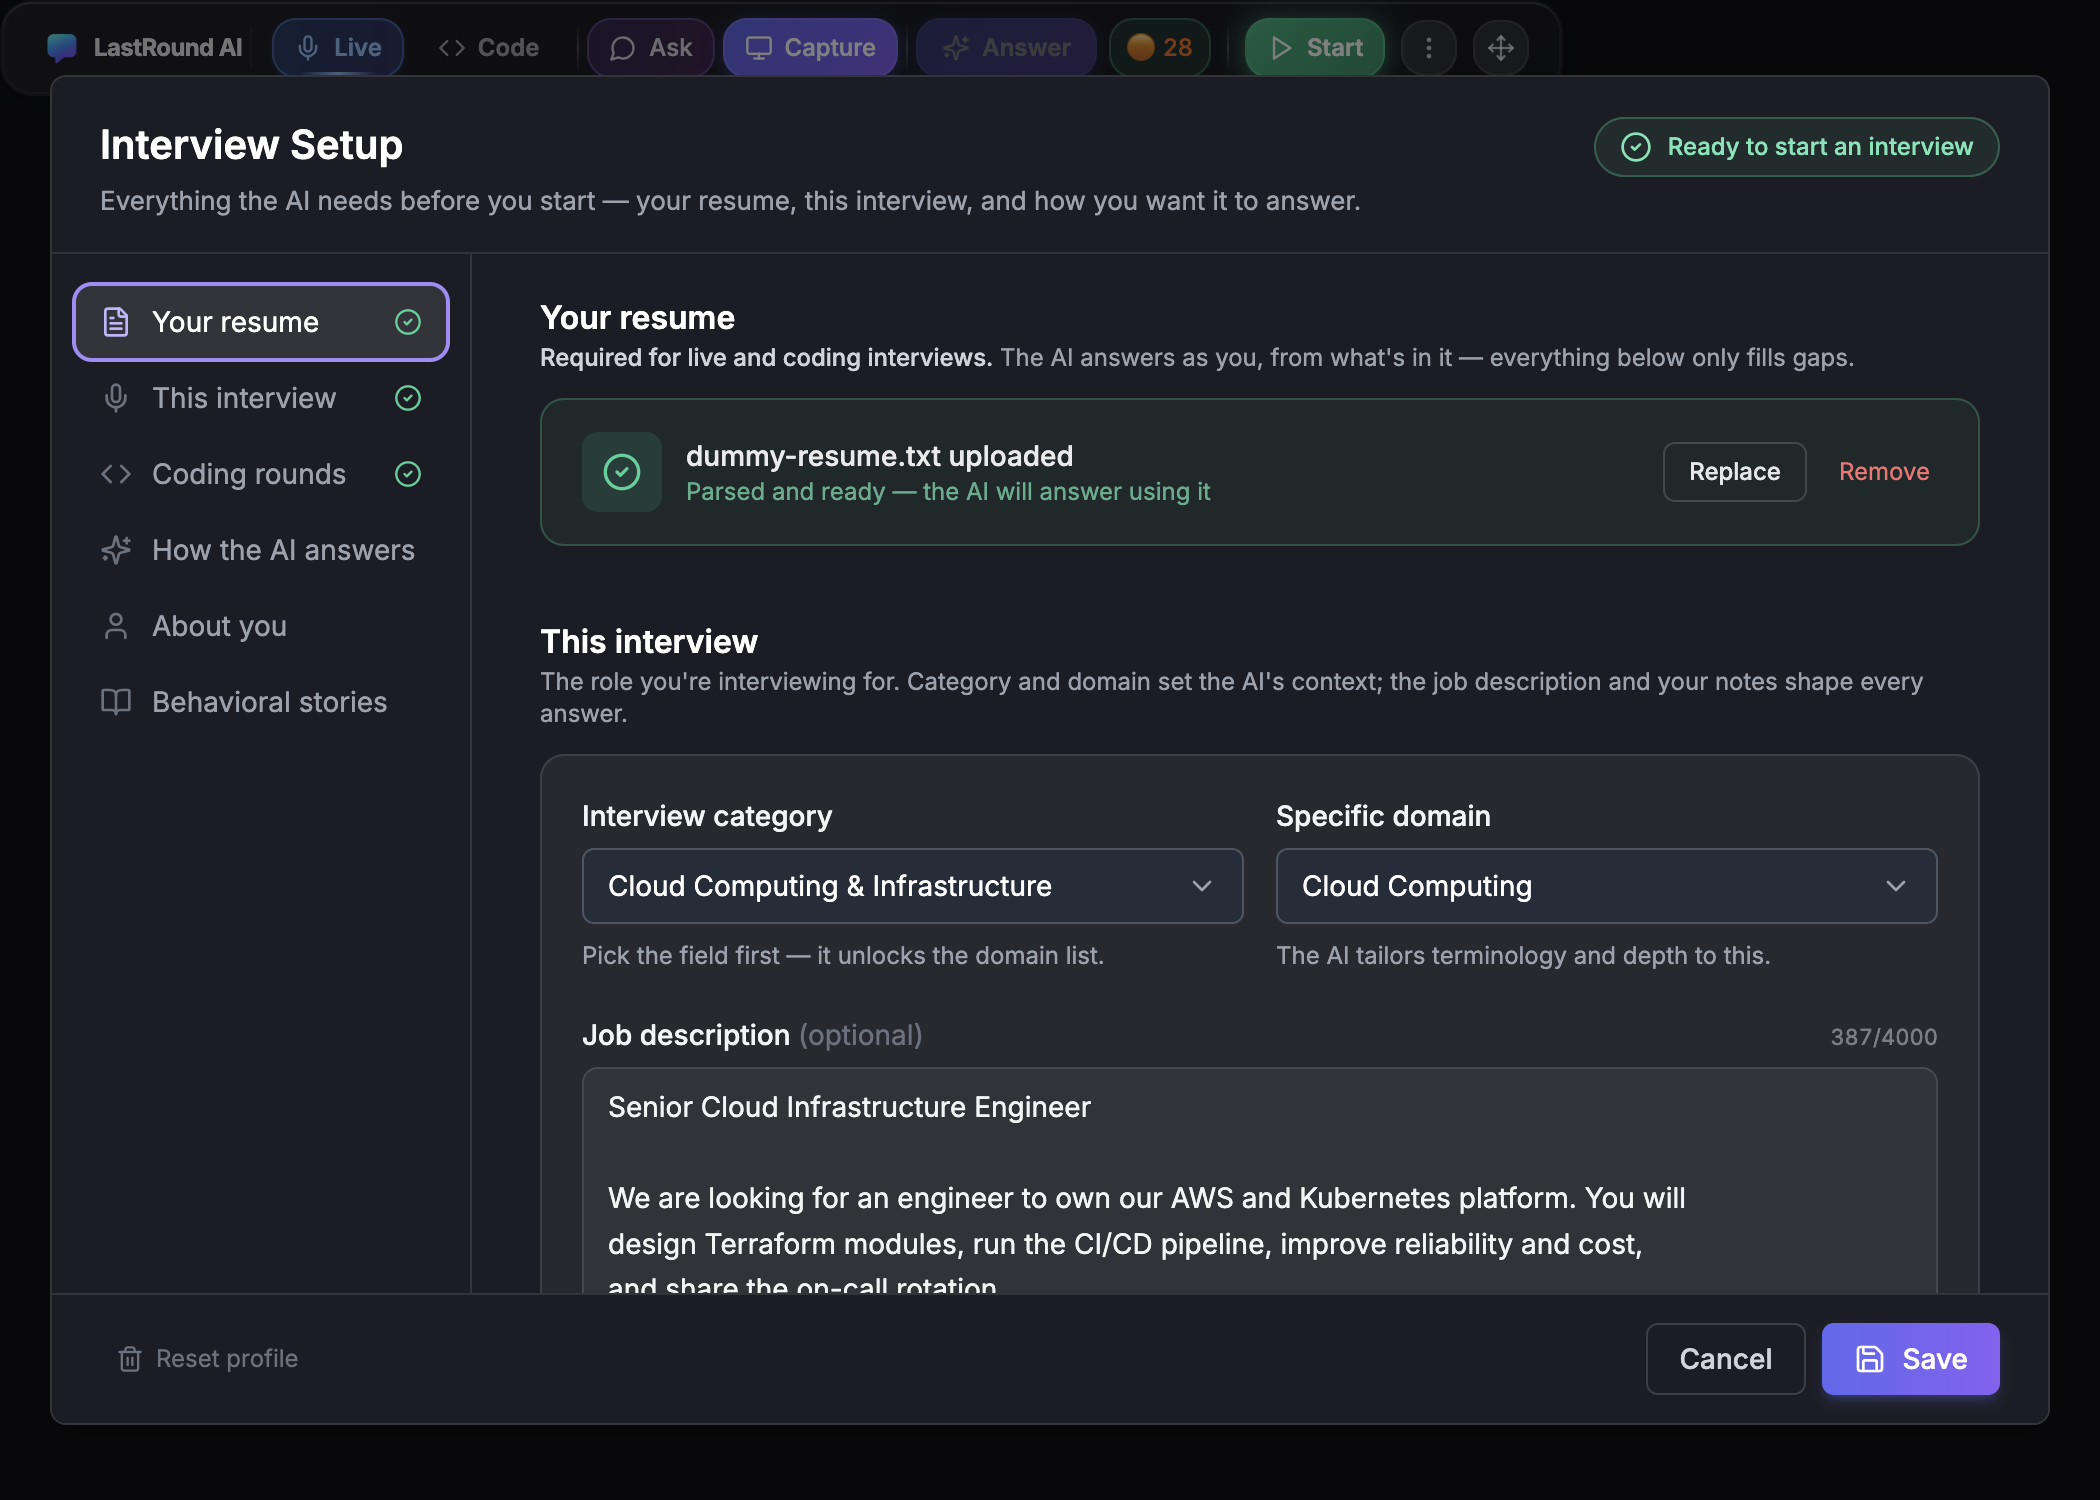
Ready to start an interview: resume on file, category and domain chosen, job description pasted. 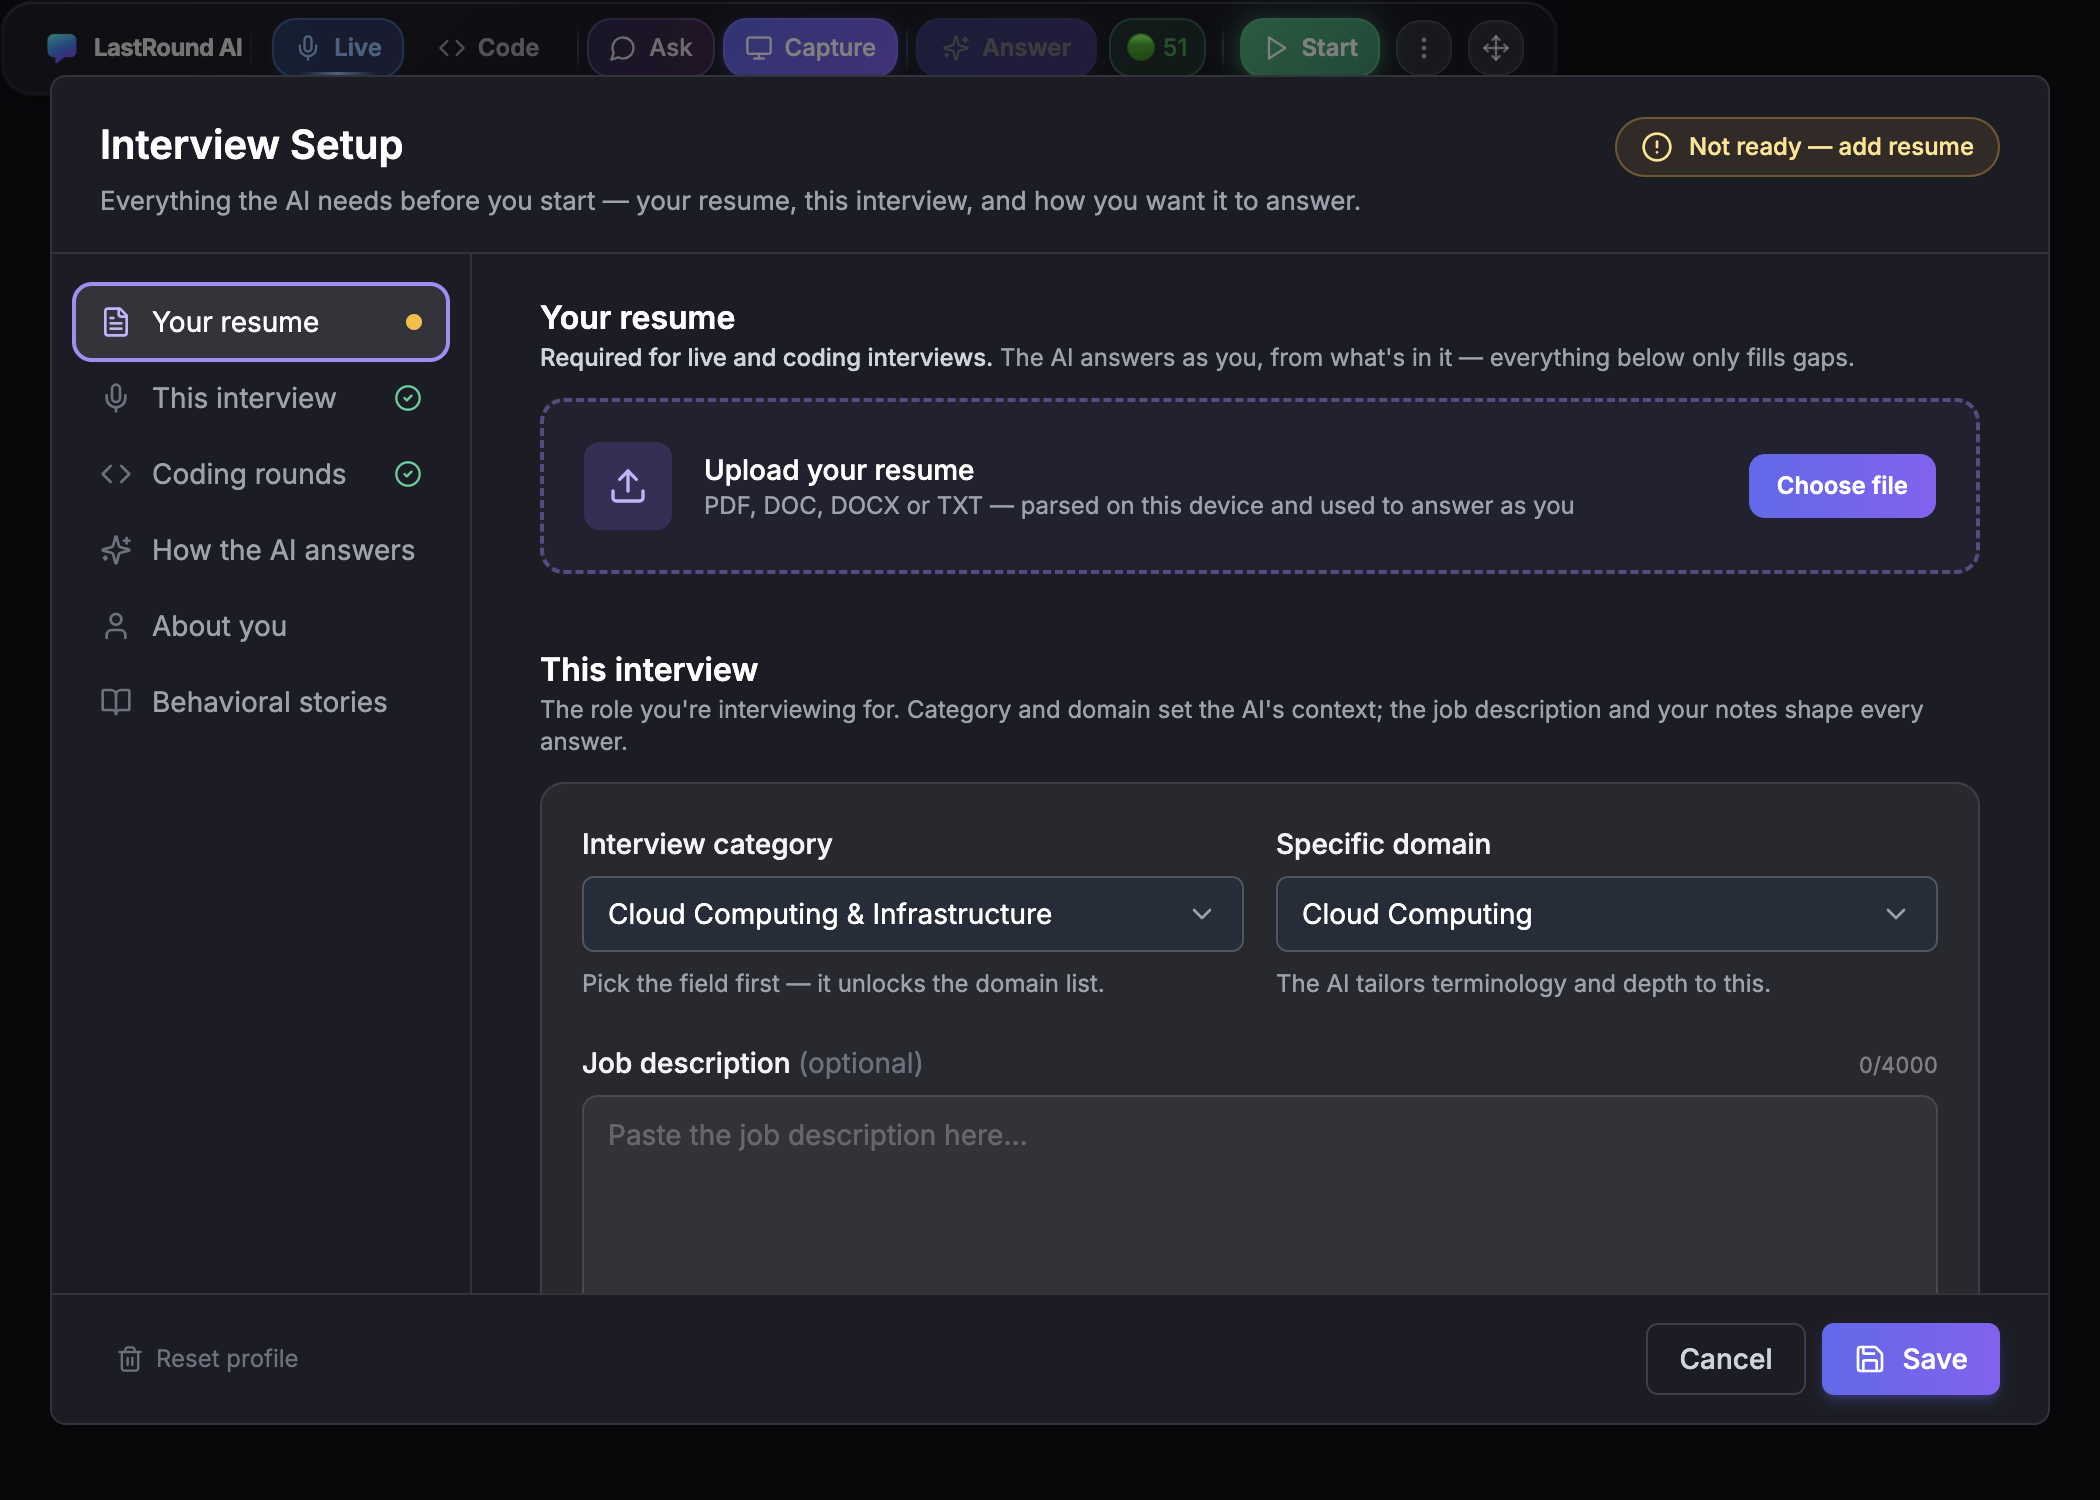
Not ready: the pill names what is missing. Fix it before the call, not during it. Shared computer?
The resume is stored on the device. If someone else used this machine, Replace it with your own before you start; the AI answers as whoever's resume is loaded.Step 2: Join the meeting as usual
Open Zoom, Meet or Teams (desktop client or browser, either works) and join the call on your normal speakers or headphones. The app captures the meeting audio from your computer, so there is nothing to route.Step 3: Click Live in the overlay (or press ⌘/Ctrl + 1)
If you have not chosen a domain yet, an Interview Domain Selection dialog opens (Choose your interview domain to get specialized AI assistance tailored to your field) with categories such as Software Development, Cloud Computing & Infrastructure, Data Science & AI, Business & Management and Healthcare & Sciences. Pick the closest match and click Start Live Interview. Your choice is saved and shown under ⋮ → Interview Setup → This interview, so later sessions start immediately.Step 4: Upload your resume if asked
Live and Code sessions need a resume so answers reflect your real experience. If none is on file, a Resume Upload dialog appears (Upload Your Resume (Required); PDF, DOC, DOCX or TXT up to 10 MB). Text is extracted on your computer. Uploading a new resume later, from this dialog or from ⋮ → Interview Setup, replaces the old one completely and the next answer uses the new one.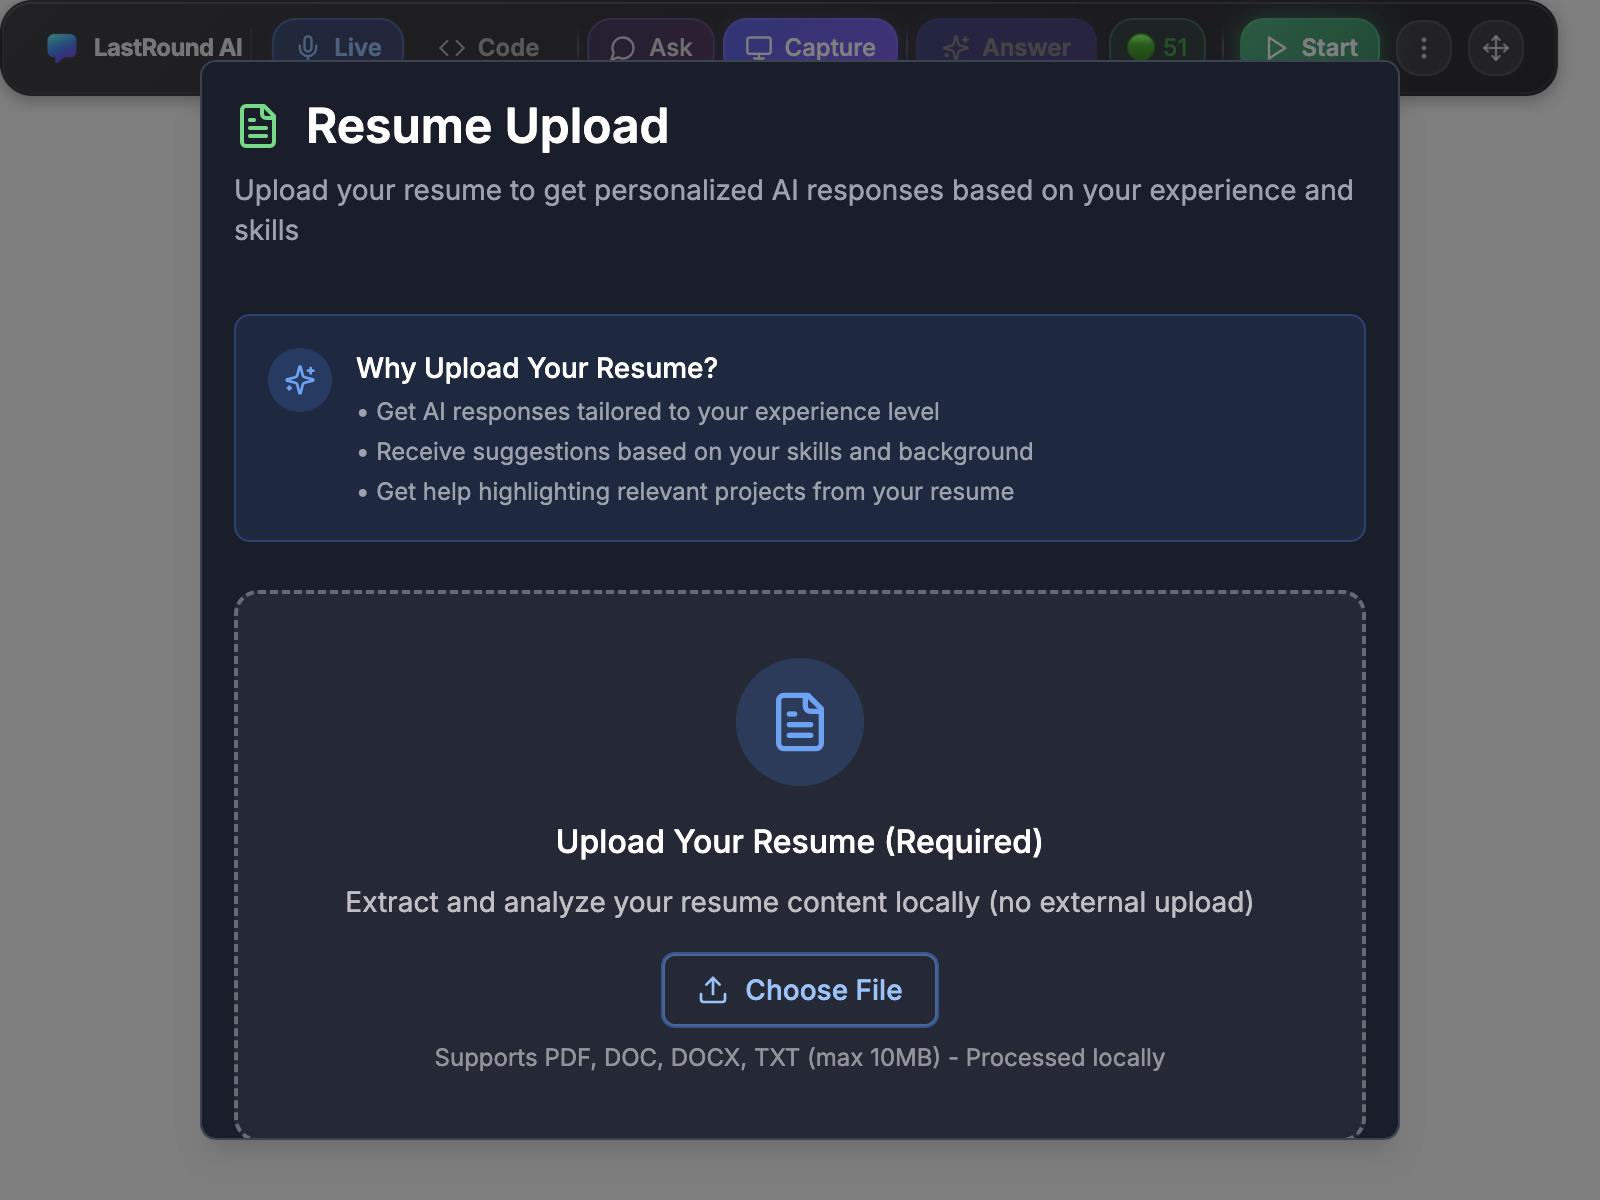
The Resume Upload dialog only appears when no resume is on file. Step 5: Click Start and confirm the details
A Confirm interview details screen appears first, listing the interview type, domain, your name and target role, resume, job description, instructions, interview language and answer mode. Check it matches this interview, then click Details are correct (or Edit details to fix something). Nothing is billed until you confirm; the confirm screen guide explains the option to skip it for a profile you always use. Once confirmed, billing starts. The Start button becomes a red End, a timer and a speaker icon appear next to the mode buttons, and a Hide button lets you collapse the answer panel. The transcript panel shows what the interviewer says as they say it. Nothing appears on the shared screen.- Transcription runs on the meeting audio your computer plays. Keep the call on your normal speakers or headphones; if you mute the meeting, nothing is transcribed.
- Your own voice is not needed for answers. ⌘/Ctrl + Shift + U mutes your microphone capture so your replies do not end up in the transcript.
Step 6: Get an answer after each question
Let the interviewer finish, then press ⌘/Ctrl + Enter (or click Answer). The copilot reads the latest transcript, shows the Summarized question: line so you can confirm it understood, then streams the answer underneath. The next section covers exactly when it will and will not answer.Step 7: End the session
Click End (or press ⌘/Ctrl + Shift + E). Billing stops at that moment. Your questions and answers are saved to Live Interview → Interview History in the web app unless you chose Keep on this device only under Settings → Privacy & Local Data.
How the Answer button behaves
| What happens | Why |
|---|---|
| Manual by default | Nothing is generated until you press Answer (or ⌘/Ctrl + Enter). You decide which questions are worth an answer, which keeps your attention where you want it. |
| Auto-submit if you turn it on | Auto-submit AI response, under ⋮ → Interview Setup → How the AI answers, generates an answer each time the interviewer finishes speaking. Convenient, but it answers more often than you need. |
| Pressing Answer again supersedes a stalled answer | If the interviewer adds a clarification and nothing has appeared on screen yet, pressing Answer again abandons that attempt and starts a fresh one from the updated transcript. If text is already streaming you get Still answering instead, telling you to give it a moment or press Stop to cancel. |
| Filler is ignored, not answered | Short acknowledgements and backchannel noise ("Okay.", "Mm-hmm.") are not treated as questions, and neither are lead-ins such as "so, the next question is". You get a Still listening notice saying that was only filler and it is waiting for the actual question. Without this, every nod from the interviewer would burn an answer and push the real question off the panel. |
| Nothing to answer yet | What you see if you press Answer with no transcript and no fresh screenshot: No question has been heard since the last answer. It is not an error. Wait for the interviewer to speak, capture a screenshot, or use Ask to type the question yourself. |
| Nothing new to answer | The Code mode equivalent: the screenshots sitting in the queue have already been answered. Capture the next question first. |
Read the Summarized question: line first
Ask: type the question yourself
Step 8: Click Ask
The pill expands into a text field with the placeholder Type your question... and the overlay widens to make room for it. Nothing else changes: the session keeps running, the transcript keeps filling, and no credit is spent by opening the field.Step 9: Type the question or the instruction
Write it the way you would say it. It does not have to be a question: rewrite that answer in twenty seconds, give me the trade-offs instead and what would you ask me next all work.Step 10: Press Enter
Or click the arrow button beside the field. The answer streams into the same panel as any other answer. Esc clears the field and collapses it, the ✕ closes it, and clicking away collapses it too as long as it is empty.Ask is the one control with no keyboard shortcut
Every other toolbar button has a global shortcut; Ask does not, so you have to click it. Your mouse pointer is visible to the other side of a screen share even though the overlay is not, so move deliberately rather than hunting for the button mid-sentence.
| Situation | Why Ask is the right control |
|---|---|
| The transcript garbled it | The Summarized question: line is not the question you were asked. Pressing Answer again just re-answers the same bad transcript. Type what you actually heard instead. |
| The question came before you pressed Start | Nothing said before Start is transcribed, so there is no transcript to answer from. Type the question and carry on. |
| You want a follow-up in your own words | The answer on screen is close but too long, too junior or aimed at the wrong angle. Ask for the version you want rather than waiting for the interviewer to ask again. |
| The question was written, not spoken | A question pasted into the meeting chat, written on a shared doc or shown on a slide never reaches the microphone. |
| You are in Code mode | Ask works there too. With an AI Style selected it is shaped by that style, so you can type a constraint ("do it without extra memory") and get the same problem answered that way. |
| What actually happens | |
|---|---|
| What it answers | Your typed text is used in place of the transcript. It is the same model, the same prompt and the same panel; only the question changes. |
| What still feeds it | Everything else: your resume, the job description and Your instructions from Interview Setup, your About you profile, the answer style, length and tone, and the running memory of this interview including the recent exchanges. An Ask answer stays consistent with what you have already said. |
| It always answers | The filler guard and the nothing-to-answer checks are skipped for a typed prompt, so you never get Still listening or No question has been heard since the last answer from Ask. If there is text in the box, you get an answer. |
| The transcript is kept, not cleared | Deliberately, so an Ask prompt does not throw away what the interviewer just said. The consequence is that the Summarized question: line above may still show the interviewer's words while the answer below is to your typed question. Your typed question is not displayed anywhere, so read the answer, not the line above it. |
| What it costs | Nothing extra. Billing is per minute of session time, not per answer, so an Ask prompt costs the same as pressing Answer: nothing on top of the clock that is already running. |
| What you see | What to do |
|---|---|
| Still answering | Give it a moment, or press Stop to cancel. An answer is already streaming, and one answer is generated at a time. Press Stop if you would rather have the typed one. |
| The Ask button is greyed out | Your balance is zero. Hovering it reads No credits remaining — please top up. Add credits and start a new session; the out-of-credits section below covers what happens next. |
| No Credits | You have no credits remaining. Please top up to continue. The same cause, reached by submitting rather than clicking. |
| AI not ready | Sign in to activate your AI assistant, then try again. The app lost its session; sign in again from ⋮ → Settings. |
| Error: Failed to generate response | A network or service failure, with the reason after the colon. Press Enter again; the session and the transcript are untouched. |
What the copilot remembers
The model keeps a running note of the whole interview. The five most recent exchanges are replayed to it word for word, and everything before them is folded into a short note of what has already been discussed, so an answer in minute 40 stays consistent with what you said in minute 5. If you named a tool, a project or a number early on, a later answer will not contradict it, and when the interviewer refers back ("you mentioned earlier that...") the answer builds on what was already said rather than starting over.
The note records facts, not opinions: the technologies and companies you named, the numbers you quoted, the claims you made and any constraint the interviewer stated. It is built in the background while the answer is streaming, so it costs you nothing in speed.
Starting fresh
Code mode
Step 11: Click Code (or press ⌘/Ctrl + 2), then Start
The Coding Interview Setup dialog asks for Round Type (DSA/Algorithms, System Design (Code), Frontend, Backend, Fullstack, Other) and Programming Language (Python, JavaScript, TypeScript, Java, C++, C#, Go, Rust, Swift, Kotlin or Other). Both are prefilled from ⋮ → Interview Setup → Coding rounds; a change here is saved back there. Click Start Coding Interview. Billing works exactly as it does in Live mode.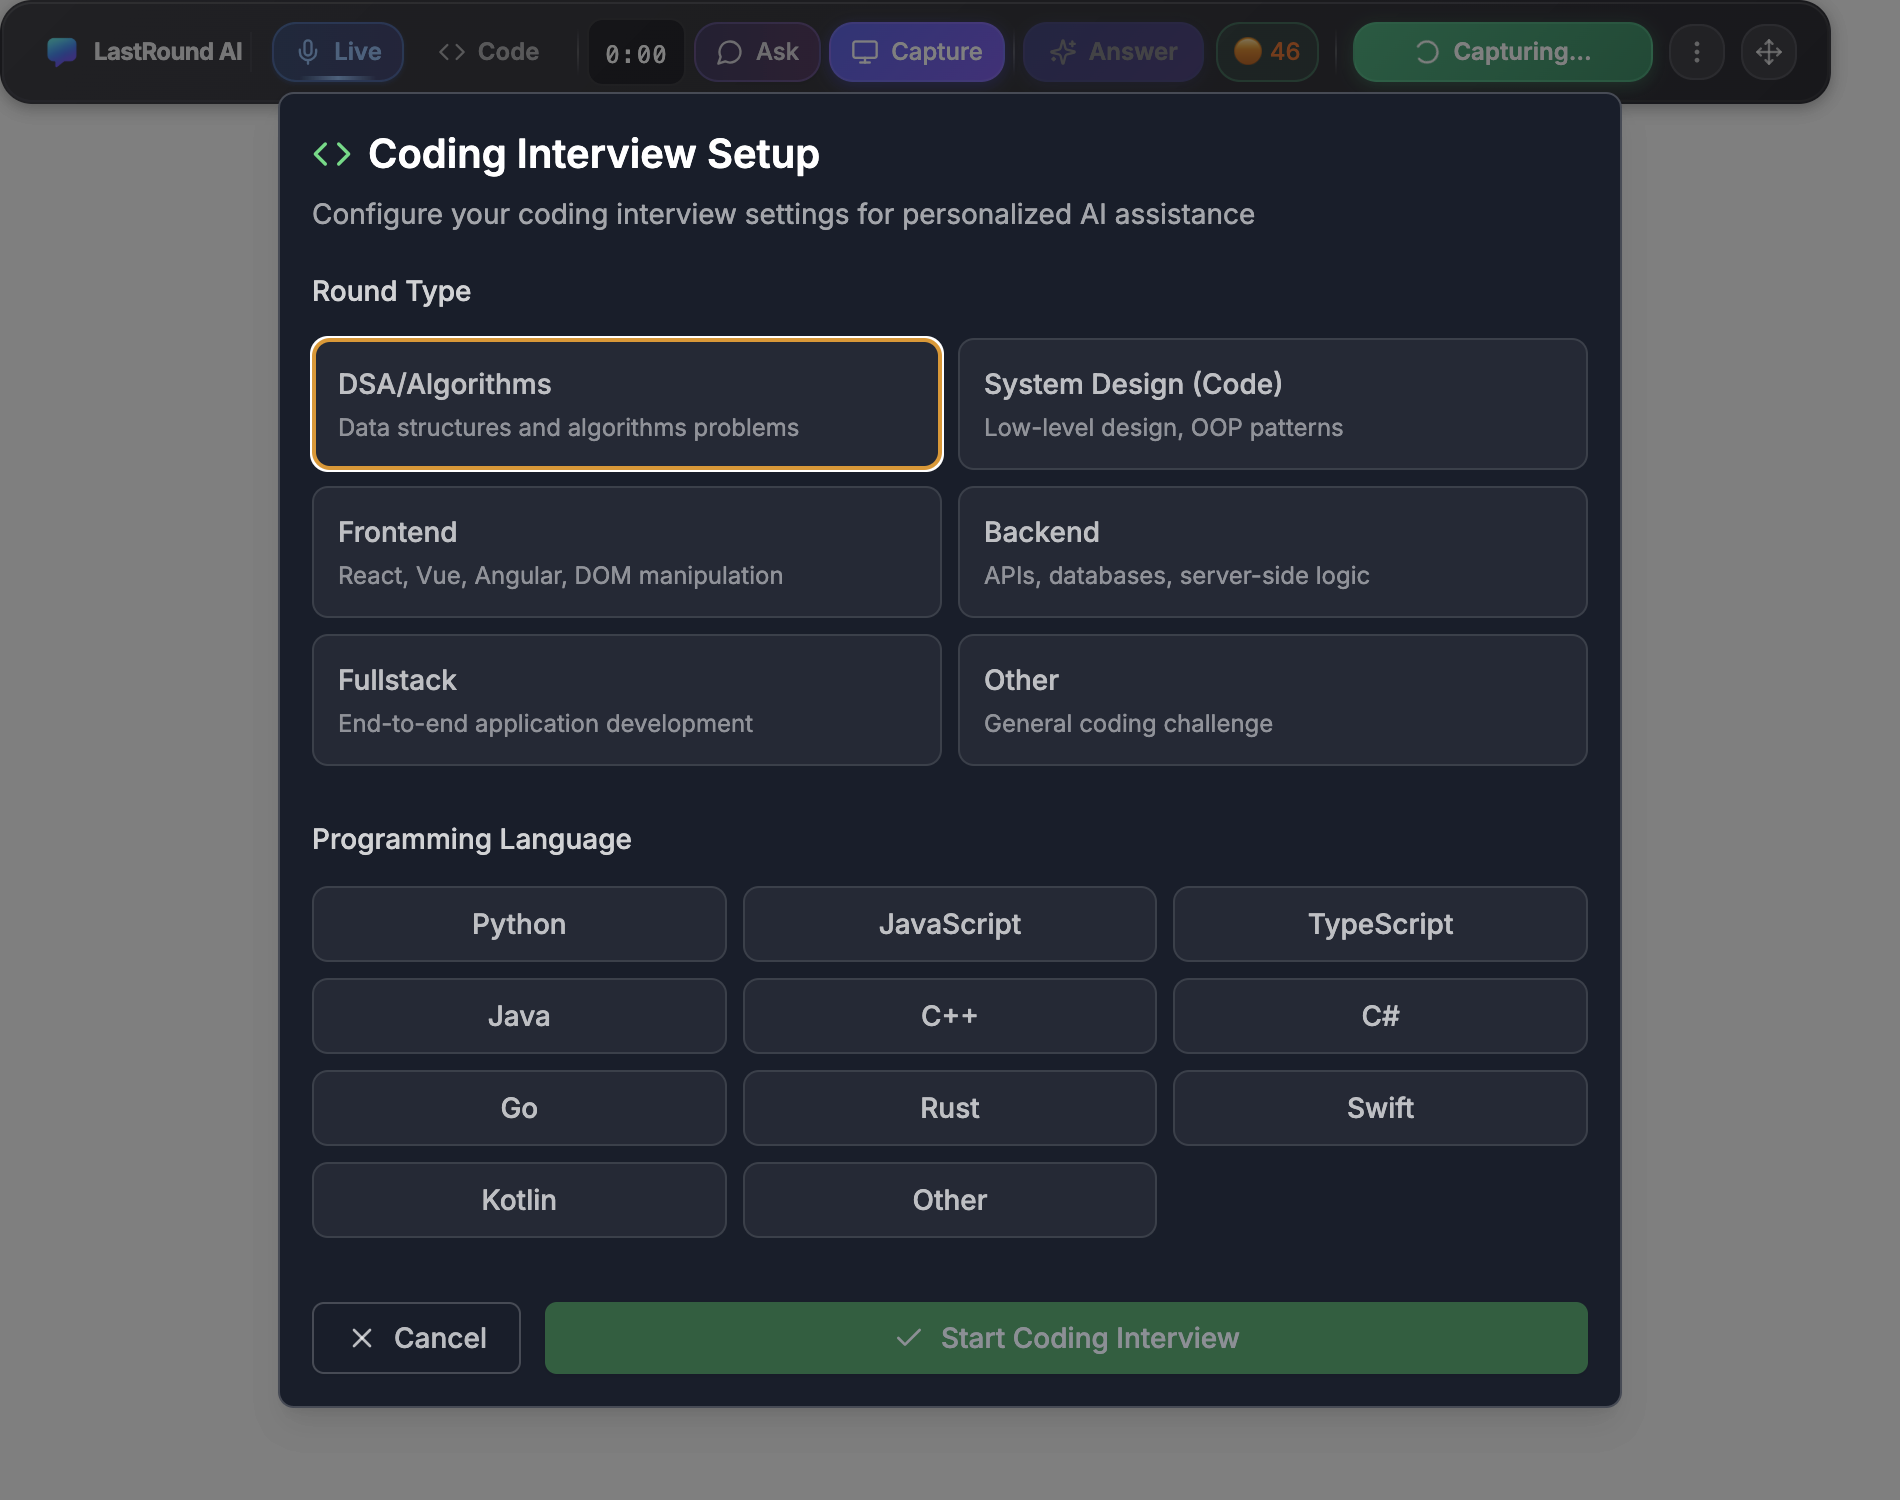
Coding Interview Setup, opened by pressing Start in Code mode. Step 12: Capture the problem
With the problem visible on screen press ⌘/Ctrl + H (or click Capture). Each capture is added to a queue and the badge on the button shows the count; Answer lights up as soon as one screenshot is queued. ⌘/Ctrl + L removes the last one and ⌘/Ctrl + R clears the queue. Capture the whole problem statement, including examples and constraints, before you ask: a solution to half a problem is worse than no solution.One screenshot queued: the badge beside Capture shows the count and Answer lights up. Step 13: Answer from the screenshots
Press ⌘/Ctrl + Enter (or click Answer) to process the queued screenshots. No transcript is needed. The answer streams in the panel, with code in the language you chose. What kind of answer you get is up to you: see AI Styles below.Coding platforms vary
The overlay has been tested on the major meeting tools, but proctored coding platforms differ and some prohibit external tools or monitor screenshots. Confirm the platform's rules before your session.
AI Styles in Code mode
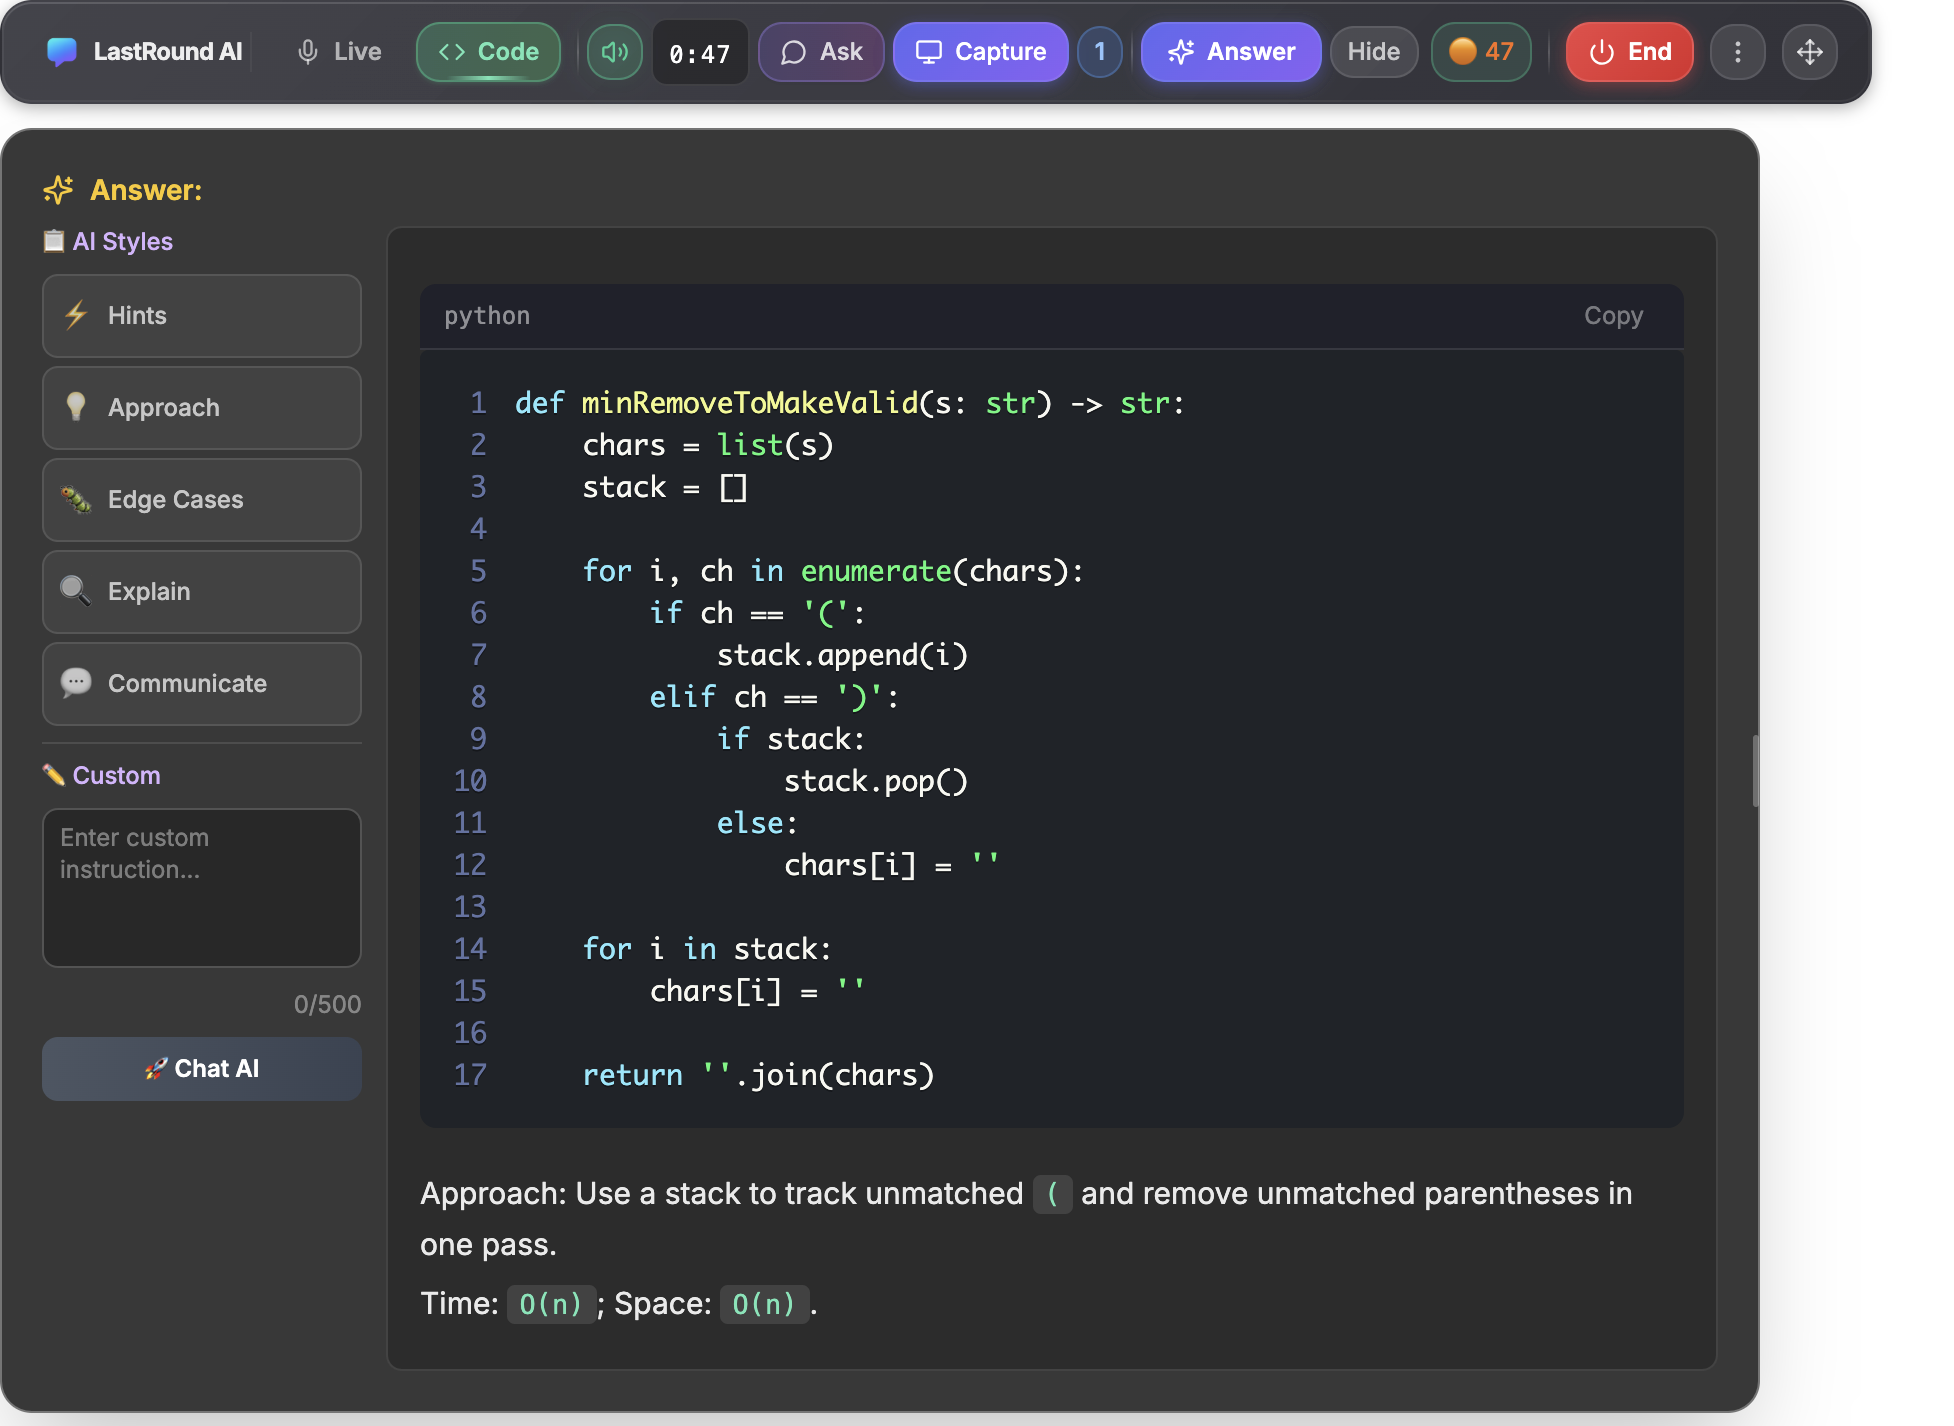
| Style | What you get back |
|---|---|
| Hints | Quick Hints: "Get subtle hints without giving away the answer". Pointers towards the solution rather than the solution itself, for when the interviewer is watching you think. |
| Approach | Show Approaches: "See multiple solution strategies and trade-offs", so you can say which one you are picking and why before you write anything. |
| Edge Cases | "Identify critical edge cases to discuss": the inputs that break a naive solution. Useful right before you say you are done, which is exactly when interviewers ask. |
| Explain | Explain Step-by-Step: "Understand solution logic to explain clearly", for when you have the code but need to narrate it convincingly. |
| Communicate | Communication Help: "Learn how to communicate solution effectively". The same solution turned into what you would actually say out loud, rather than code and notes. |
| Custom | A free-text box below the styles, placeholder Enter custom instruction..., capped at 500 characters with a counter underneath. Use it for anything the fixed styles do not cover, such as asking for a lower-memory version or the same solution in another language. |
| Chat AI | The button under the Custom box that sends what you typed. It stays disabled until there is text in the box, and reads Generating... while it works. |
Styles are cheap, sessions are not
Session lifecycle and credits
| Moment | What happens |
|---|---|
| Start | The session opens, the timer starts and billing begins. Nothing before this point is charged. |
| During | Answers, captures, AI Styles, Ask prompts and re-asks are all included. The number of answers you generate does not change the cost. |
| End | The timer stops and the session is settled. Ending promptly is the only way to keep a session cheap. |
| The charge | The connected time, in minutes, rounded up, with a minimum of one credit. A 40-second session costs 1 credit, 61 seconds costs 2, and 5 minutes 1 second costs 6. A desktop session shorter than 30 seconds is not billed at all. |
| Running out | The session ends by itself when your balance reaches zero, or when it reaches the limit your balance could cover at the start. Top up from ⋮ → Subscription and start a new session. The next section has the thresholds, the exact wording and what to do about it. |
How many credits you have, and what a plan includes
End the session, do not just hide the overlay
Running out of credits mid-interview
| Balance | What the pill looks like |
|---|---|
| 51 or more | Green dot and the number. Nothing else. |
| 11 to 50 | Orange dot and the number. |
| 6 to 10 | Yellow dot and the number. |
| Exactly 5 | Yellow dot and the number, but the pill itself turns amber and pulses, and an Add button appears next to it. There is no warning word at 5, so the pulsing pill is the only signal. |
| 1 to 4 | The word Low! appears beside the number, the pill stays amber and pulsing, and Add is still there. |
| 0 | Red dot and the words No credits!. The Add button is gone and the Start button is replaced by a Subscribe button, so there is no way to open a session at all. |
The number does not count down while a session runs
Step 14: Start fixes the length of the session
When you press Start, the app converts your balance into minutes and sets a deadline for the session there and then. Fifteen credits buys a fifteen-minute session. The ceiling is 480 minutes, which is 8 hours, whatever your balance. If your balance is below 1 you never get this far: there is no Start button, only Subscribe. Reaching Start another way (a keyboard shortcut, for instance) gives you Insufficient Credits and You need at least 1 credit to start a session. Current balance: 0.Step 15: Buying credits mid-session does not extend it
The deadline set at Start can be shortened, if the same account spends credits somewhere else while you are running, but it is never lengthened. Credits bought during the interview apply to your next session, not to this one. If you need more time, you have to end the session and start a new one.Step 16: At the deadline the session ends itself
You get a short message reading Credit limit reached and This interview ended automatically at your available credit limit. The session is already over by the time you have read it; there is no confirmation step and no way to extend it. Transcription stops, the timer stops, and the toolbar goes back to its pre-session state.There is no warning in the last minute
The app does not count you down to the end of a session. Running low on credits, with a line reading "N credits left — top up to keep going without interruption", is tied to your account balance rather than to the session clock, so in practice you see it before you start rather than during. Treat the balance you had at Start as the whole story.Step 17: If the balance itself reaches zero, the same thing happens
Spend the account's credits elsewhere while this session runs and you get Out of credits with Your session paused — top up to start again. The session ends about a second later. Despite the word "paused", it is not resumable: you start a new one.Step 18: Answers stop before the session does
If the balance is already at zero, pressing Answer gives you No Credits and You have no credits remaining. Please top up to continue., and the Ask button is greyed out with the note No credits remaining — please top up. That is your last warning before the session closes.
What to do about it
| When | What to do |
|---|---|
| Before the interview | Look at the pill and do the arithmetic: a 45-minute interview needs at least 45 credits, and a session cannot outlive the balance you started it with. This is the only moment where topping up actually buys you time. |
| During, if you see Low! | Do not stop to buy credits mid-answer. Finish the question you are on, and expect the session to close at its deadline. |
| The moment it ends | End is already done for you. Top up, then press Start again to open a fresh session. The interview keeps going; you lose a few seconds and the running memory of the conversation so far, because a new session starts with a clean context. |
| Where to top up from the overlay | Add, beside the pill when you are at 5 or fewer, and Subscribe, in the Start button's place at zero, both open the billing page. |
The billing window is not hidden from a screen share
Where the credits themselves come from
If transcription drops mid-interview
When the transcription connection drops, the app reconnects it immediately, and retries twice more with a short pause between attempts. If none of those take, it switches to the other speech provider automatically. The whole sequence takes about a second. You do not restart the app, you do not restart the session, and audio capture is never torn down, so the meeting audio keeps flowing throughout and the interviewer notices nothing.
A reconnect to the same provider is silent. A switch to the other one shows a brief Transcription Restored notice naming the provider that was unavailable. In the rare case that both are unreachable you get Transcription Error, which asks you to end and restart the interview; that is the only case where you have to do anything.
When it is not a dropped connection
Stealth: what it hides and what it does not
| Situation | Is the overlay visible? |
|---|---|
| You share your screen on a video call | No. The overlay window is excluded from screen capture by the operating system, so participants see your desktop without it. |
| Someone records the screen | No. A screen recording captures the same stream a screen share does, so the overlay is absent from the recording too. |
| Someone is looking at your physical screen | Yes. Screen capture exclusion is a property of the video stream, not of the display. Anyone in the room, or a camera pointed at your monitor, sees the overlay exactly as you do. |
| Your mouse pointer moves over the overlay | The pointer is shared even though the overlay is not, so clicking around the overlay is visible as unexplained pointer movement. Use the keyboard shortcuts. |
| A proctored assessment platform | It depends on the platform, and their rules apply regardless of what is technically visible. Lockdown browsers used by some vendors can block the overlay outright. Check the platform's rules and the published compatibility status first. |
Check what others see before the call
Keyboard shortcuts
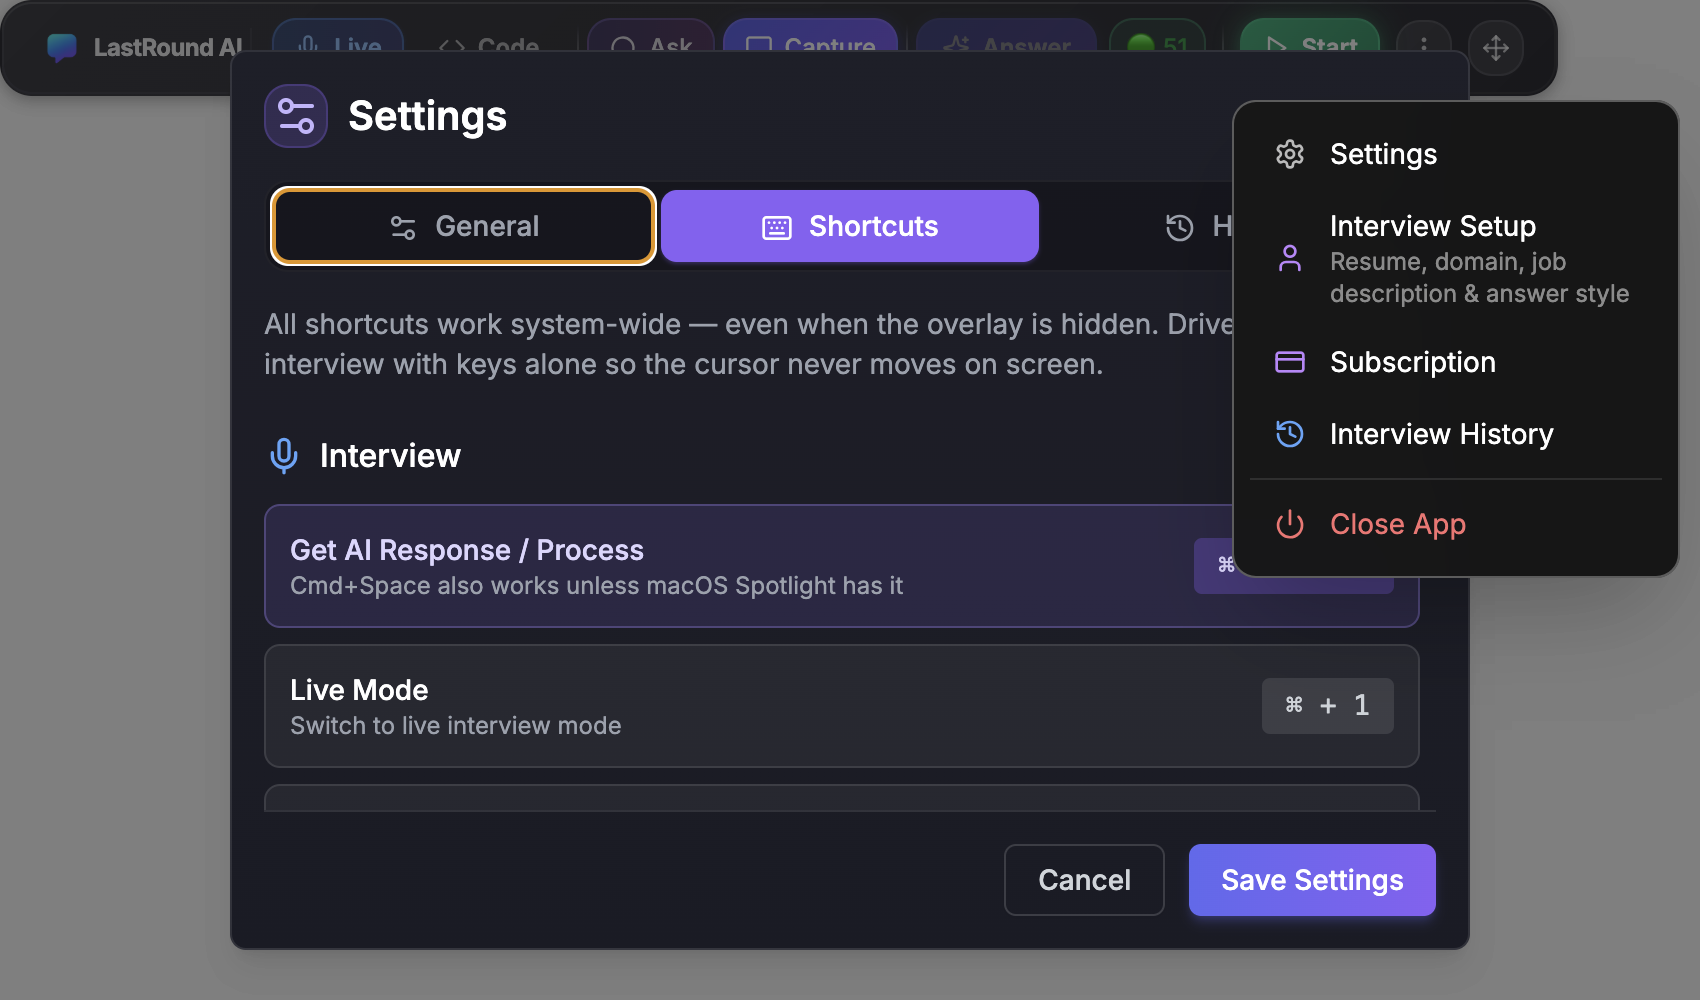
| Keys | Action |
|---|---|
| ⌘/Ctrl + Enter | Generate AI response |
| ⌘/Ctrl + H | Capture screenshot |
| ⌘/Ctrl + L | Delete last screenshot |
| ⌘/Ctrl + B | Toggle window visibility |
| ⌘/Ctrl + Shift + U | Toggle mic mute |
| ⌘/Ctrl + Shift + E | End session |
The keyboard shortcuts reference has the full list, including moving and resizing the overlay, toggling stealth, and the combinations that take precedence over other apps while LastRound AI is running.
Browser Live Copilot (no install)
Step 19: Open Live Copilot and complete the three steps
Resume (pick a saved resume or upload one; you can Skip for now), Experience (Interview Domain and Years of Experience), then Schedule: choose Start Now or Schedule Later and click Start Interview.Step 20: Follow the Screen Sharing Setup checklist
A modal explains the four things that make or break the browser copilot:- Open Meeting in Browser: join Zoom, Google Meet or Teams in a browser tab, not the desktop client. Chrome or Edge is recommended.
- Select "Tab" Option in the browser's share dialog (not Window or Entire Screen).
- Enable "Share tab audio": without it the copilot hears nothing.
- Click "Share", then I'm Ready, Start Interview.
Step 21: Run the session
Click Start Capture, pick the meeting tab with audio, and the transcript begins. After each question press Space or click Generate AI Response. Analyze Screen reads a coding question off the shared tab, Clear wipes the answers, Mute silences your own microphone, Stop ends capture. The credits counter in the bar updates as you go.It is visible if you share your whole screen
Unlike the desktop app, the browser copilot is an ordinary tab. Share only the meeting tab, never your entire screen, and keep the copilot tab out of any shared window.
Mobile Copilot
Step 22: Open Mobile Copilot on your phone
Sign in at app.lastroundai.com on your phone and choose Live Interview → Mobile Copilot. Complete Resume and Experience, then tap Start Interview.Step 23: Follow the Ready to Start checklist
- Allow Microphone when the browser asks.
- Position Device where it can hear the interviewer clearly.
- Generate Answers: tap Generate Response after each question.
- Mute When Speaking so your own voice is not transcribed.
Step 24: During the interview
Tap Start Session. The status line shows Listening.... After a question, tap Generate Response; use Mute / Unmute while you answer, and End when you are done. Bluetooth headsets are not recommended: the phone should hear the room directly.
Step 25: Review past sessions
In the web app open Live Interview → Interview History. Each entry shows the date, session type (LIVE or CODING), domain, duration and number of questions; expand it to read the questions and answers, download it, or delete it. AI Summary lists generated summaries of your sessions.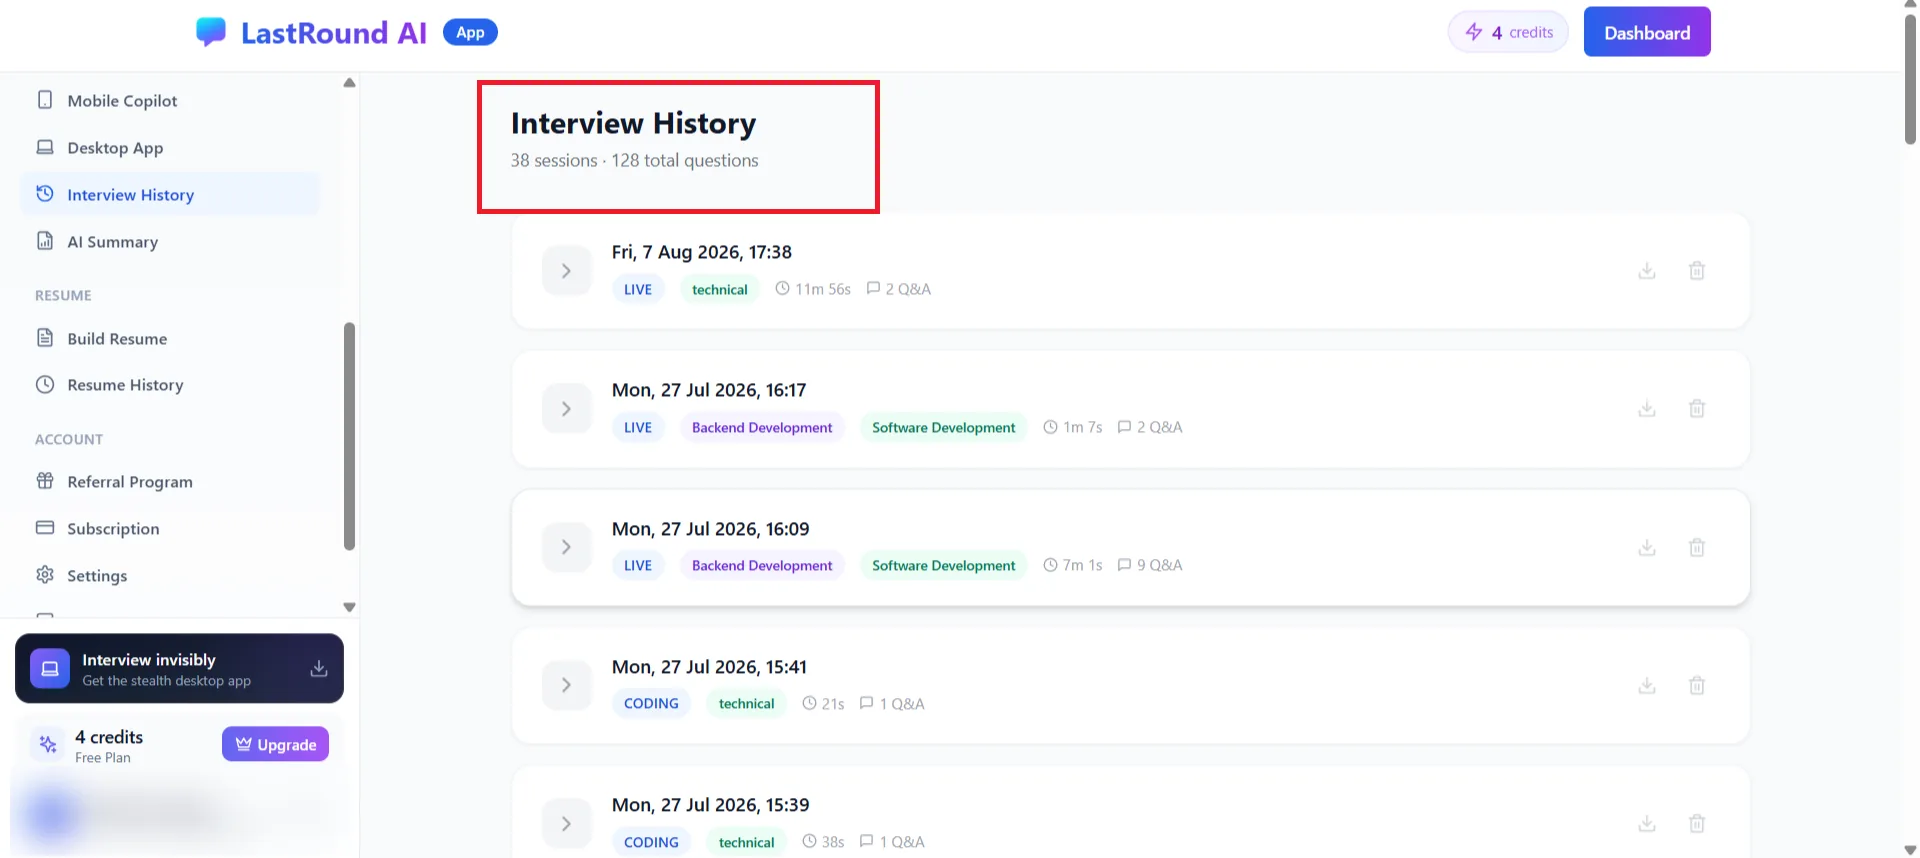
Live Interview → Interview History. Prefer not to keep transcripts?
Turn off Interview review history under Settings → Data & privacy in the web app, or choose Keep on this device only under Interview history in the desktop app's Settings → Privacy & Local Data. Duration and credits are still recorded for billing.
Still stuck?
Signed in? Open a ticket under Account → Support in the app. Otherwise use the contact form or email. Tell us what you tried, which page of this guide you were on, and your operating system or browser.